$5 Date Night Ideas

When you are living on a tight budget, date nights often fall to the bottom of the priority list, which I think is quite a shame. If you are working towards a goal of saving or paying off debt, you don't have to sacrifice quality time with your significant other. Some of my favorite dates with Brian have cost little to no money, so I thought it would be fun to list some of our favorite $5-ish dates as we commence the weekend.

Elizabeth Burns Design - Cheap Date Night Ideas for $5 or Les
  1. Enjoy a cheap bottle of wine al fresco - One of my favorite things in the whole world is great conversation. Conversation that is full of belly laughs and chats about life things. I can recall many heart to hearts on our front porch rocking chairs over a bottle of vino. My favorite wine is from Trader Joes and it costs five bucks (plus a bit for tax). I am no wine connoisseur, so I am okay with the cheap stuff, but if you enjoy the finer wines, this might not be the best date idea.
  2. Frozen pizza and Netflix movie night - After a long week of work, sometimes it is nice to just throw on sweat pants, shove a pizza in the oven, and binge watch your favorite Netflix show. We are also big fans of the hot-n-ready pizza from Little Caesars. Don't knock it until you try it.
  3. Go for a long walk - This is especially fun if you have a pooch to walk. We take Lola for walks usually daily, and it is a nice way to talk about the events of the day and spend some time outside excercising. The best part about this date? It's free. :)

What are your favorite inexpensive date nights? I would love to hear them!

Installing Vinyl Flooring

We were able to finally get all of the vinyl flooring down in the bathrooms and laundry room (hip-hip-hooray!), so I wanted to post a full and detailed tutorial on the process we used. Yet again, this project took twice as long and cost twice as much as I originally thought it would, but Brian and I are pretty thrilled with the outcome.

Please note, we followed the instructions from the manufacturer. Your particular flooring may require a different process, so I would be sure to follow those directions. These are just some guidelines. :) Brace yourself - this post turned into a novel.


Here are the supplies we used:


Here is an overview of the steps we took. I would allow at least three hours per room for prep work and installation.

  1. Purchase your vinyl
  2. Acclimate the flooring to the new environment
  3. Create a template of your space
  4. Cut and install the sub-floor
  5. Put down the adhesive
  6. Cut the vinyl to fit the room
  7. Installation

purchase VINYL

Before heading to the store, make sure to measure (and measure again) the footprint of your space(s). If you are changing out the floor in multiple rooms like we did, I recommend drawing out the rooms dimensions to scale on graph paper, and then cutting them out and putting them together like a puzzle to determine the most efficient configuration. Feel free to email me if you have questions about measuring and figuring out how much to buy.

There are SO many options out there for vinyl flooring. We chose this sheet vinyl due to it's ease of installation, low cost, and durability. I also really loved the neutral marble look. A few things to note: most sheet vinyl comes in widths of 12', which is actually quite long when it comes to the logistics of getting it home! Plan ahead for the transportation of your new vinyl; it ain't going to fit in your four door sedan! Even in Brian's truck, we had to stick it through the window and off the tail gate. Also, make sure it is not going to rain during your transport.

Elizabeth Burns Design | How To Install Vinyl Sheet Flooring, DIY

ACCLIMATE flooring

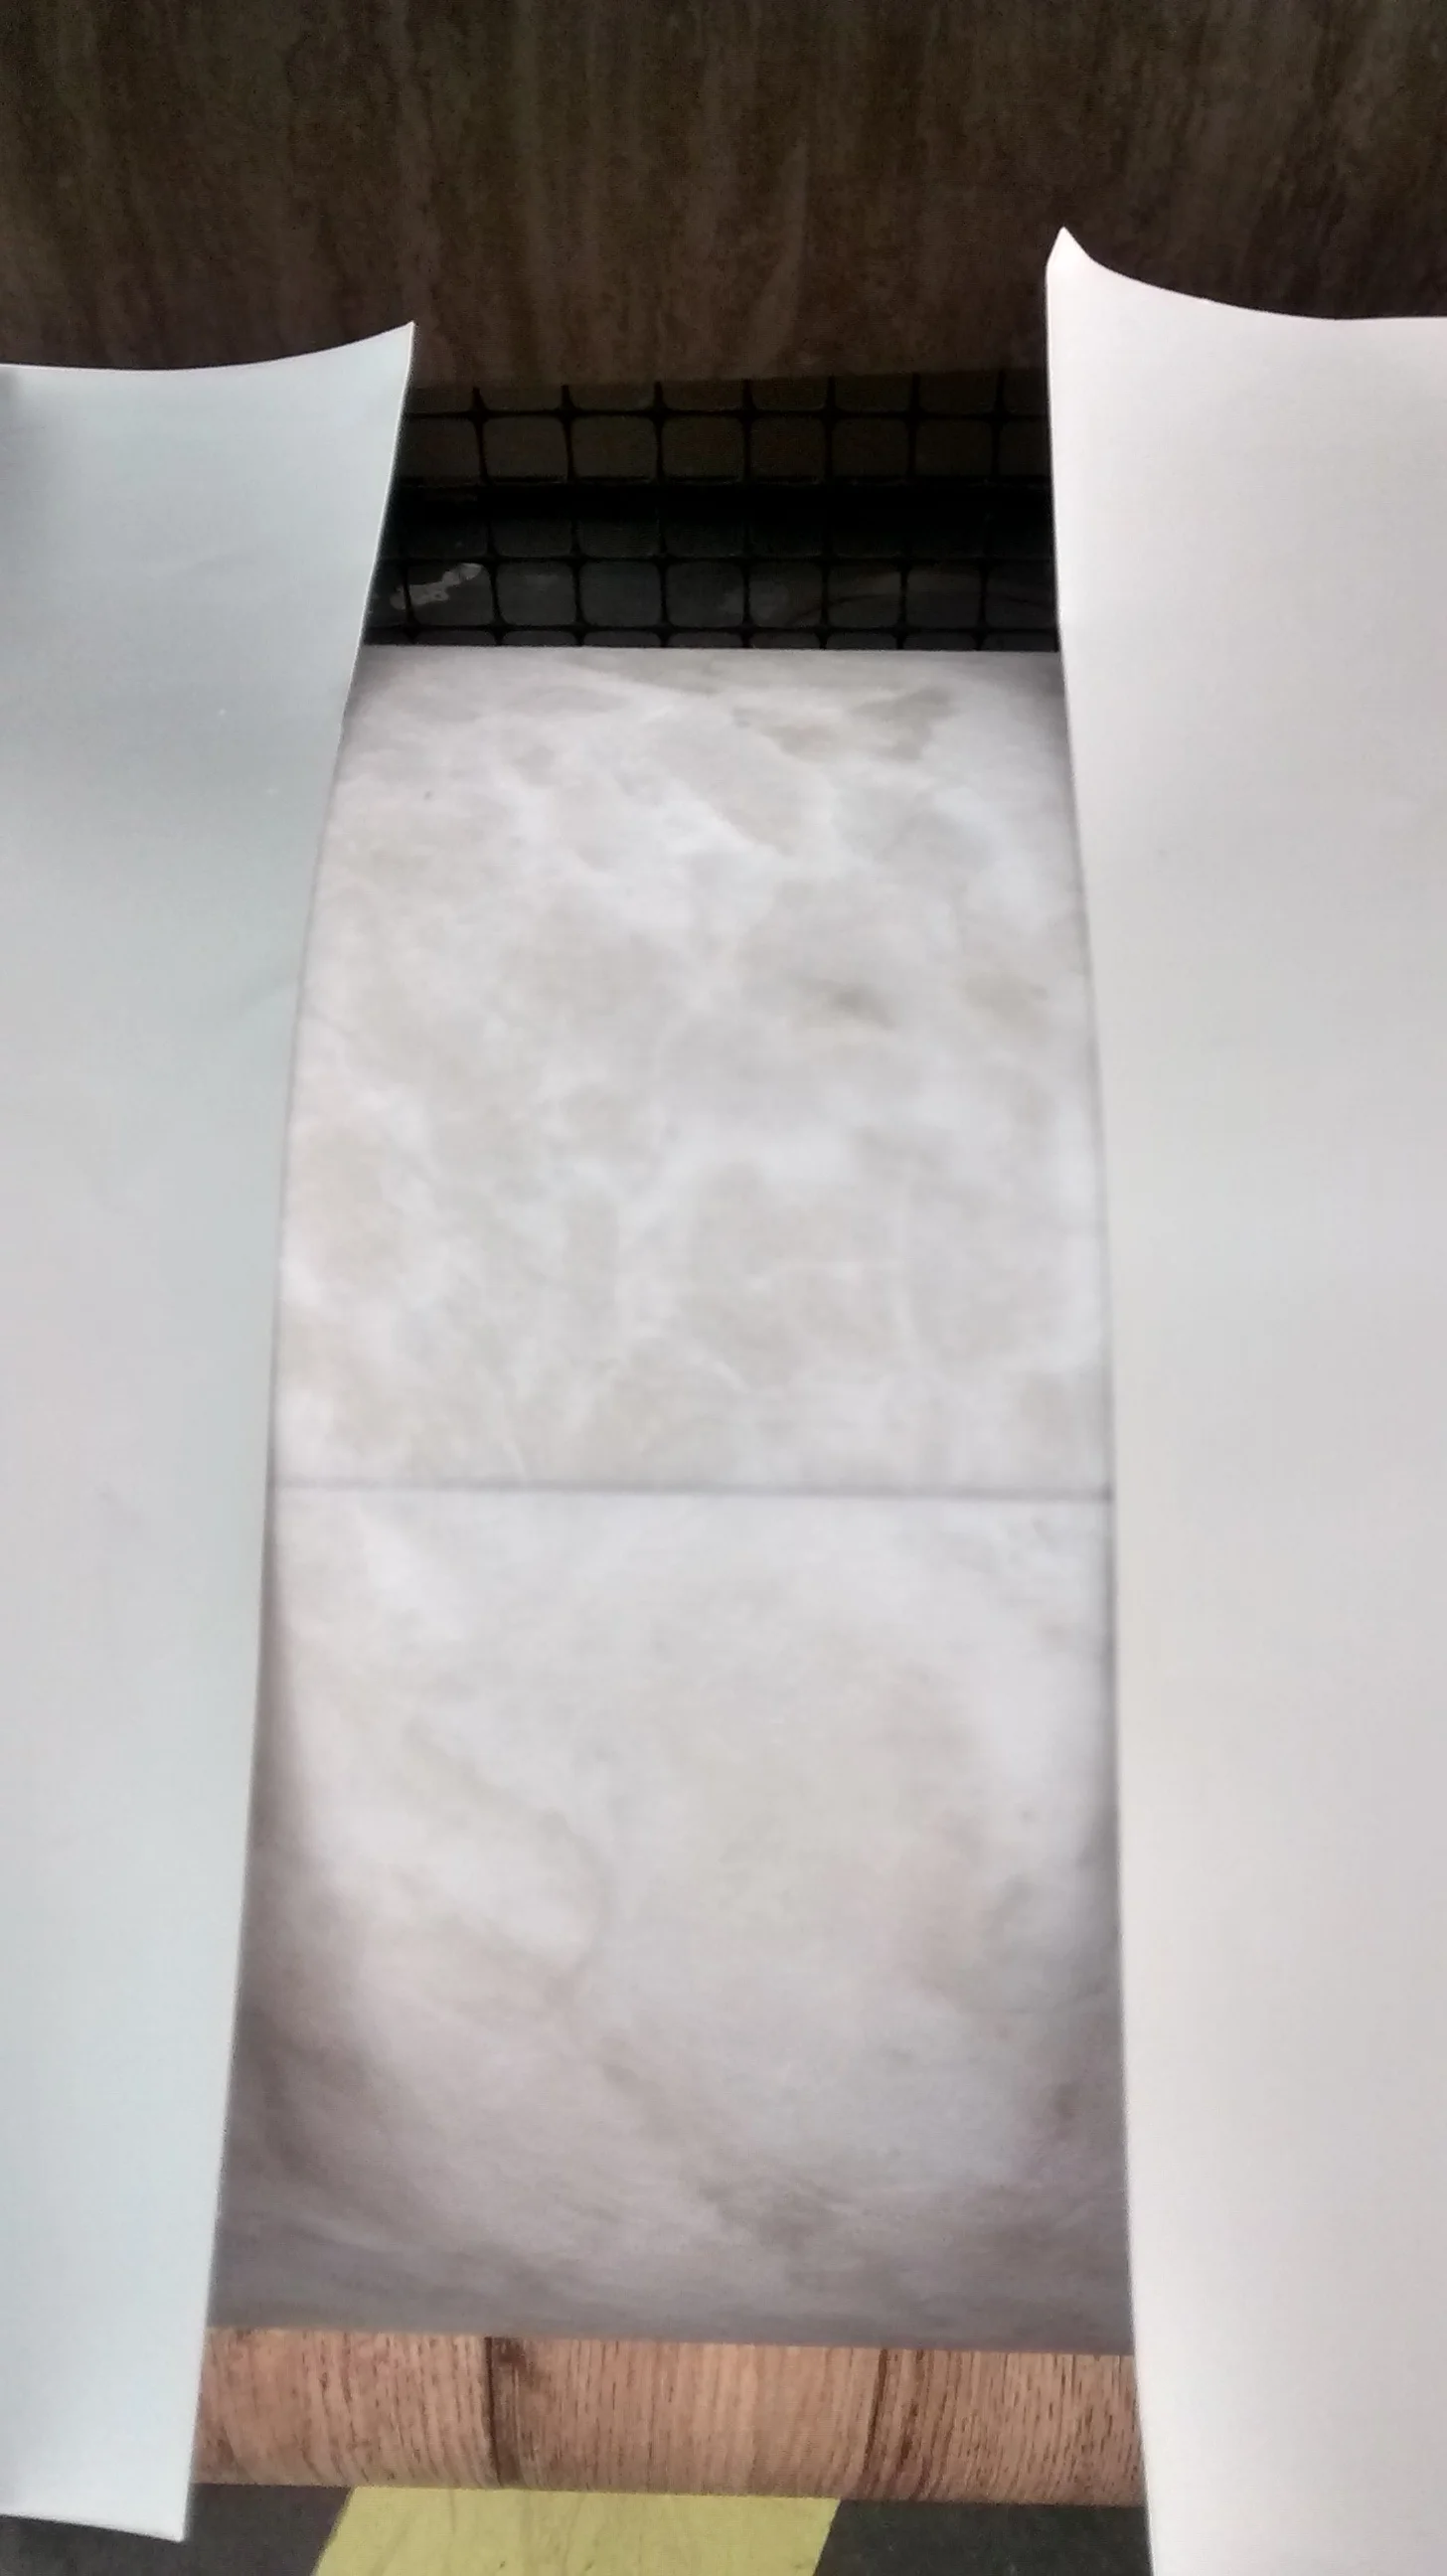
They say you should let your vinyl flooring acclimate to the house for at least 24 hours. It also needs to flatten out from being rolled up. Find the biggest room in your house, and let the flooring flatten out while you go on to the next steps.

Elizabeth Burns Design | How To Install Vinyl Sheet Flooring, DIY

CREATE A TEMPLATE

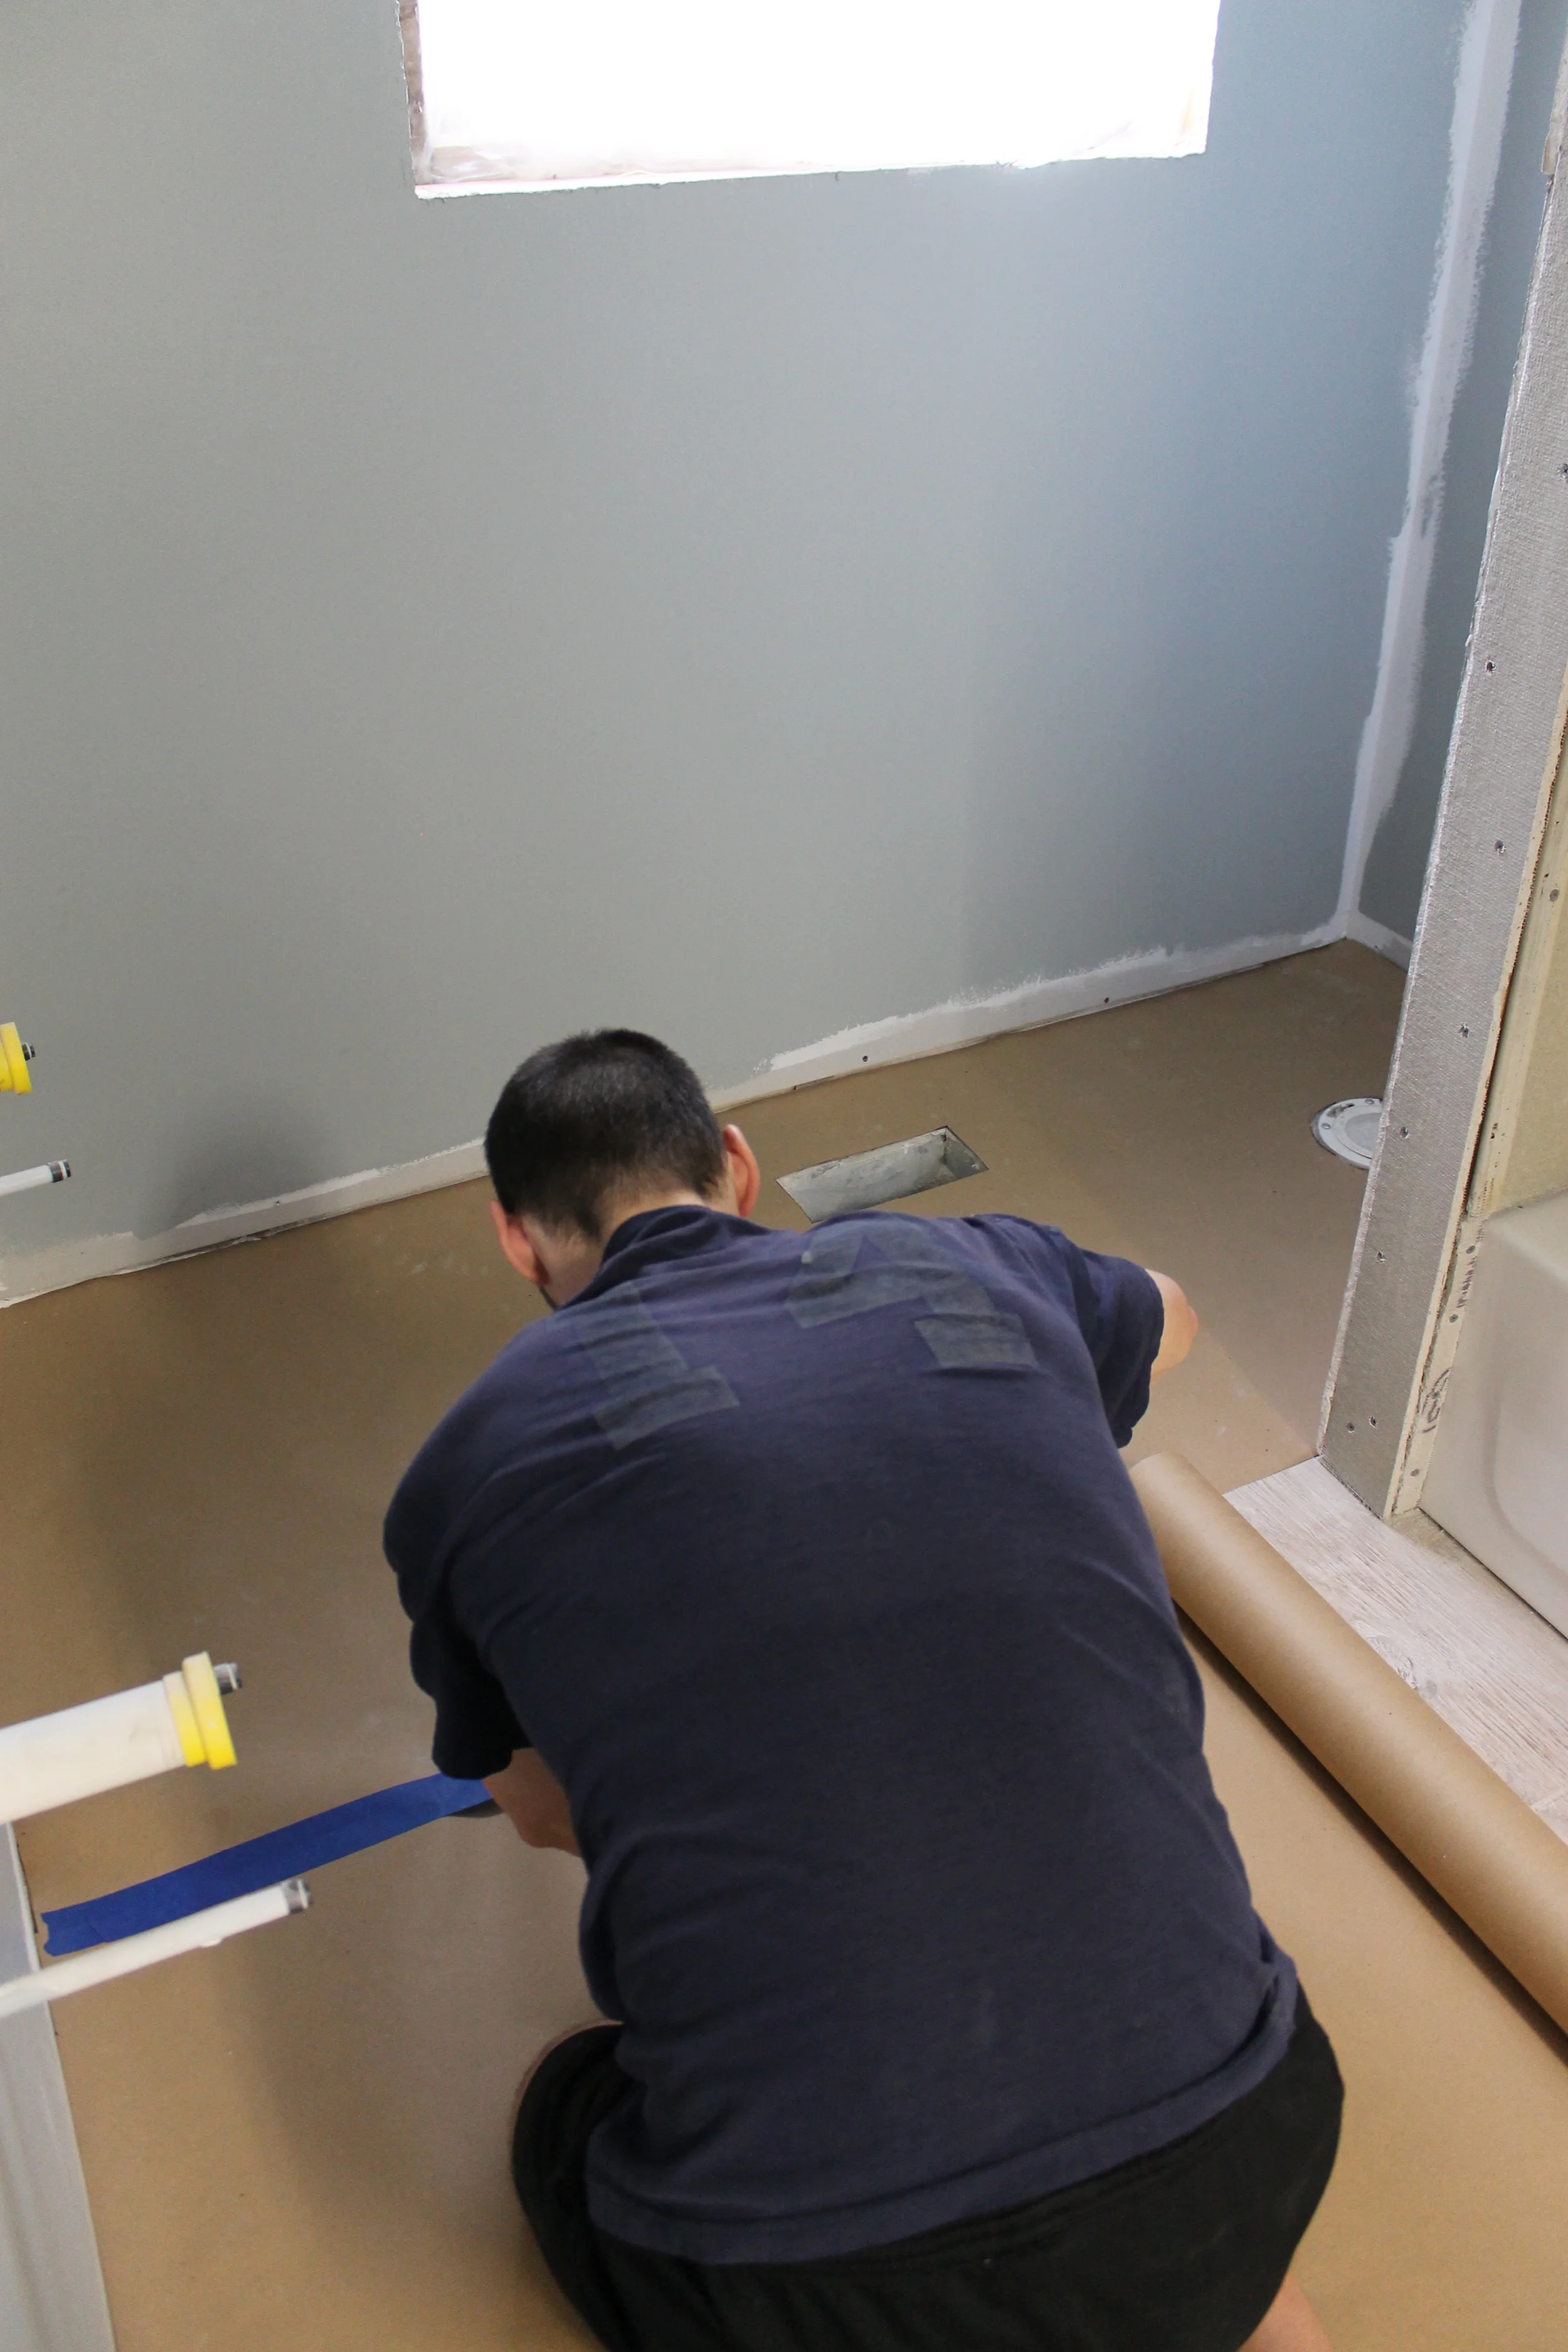
Next step is to create a template! This will save you so much time and measurement second-guessing. For this process, grab your contractors paper, measuring tape, pen, straight edge, scissors, and tape. If you have baseboards or trim already installed, make sure these are removed or else your cut vinyl will be too small. Measure the length of the area, mark on the paper to that length, and then use your straight edge to draw a line. Cut on this line and lay that paper in place on the floor.

Elizabeth Burns Design | Step by Step Guide on How To Install Vinyl Sheet Flooring, DIY

You may have to cut out obstacles such as air vents or plumbing fixtures. 

Elizabeth Burns Design | Step by Step Guide on How To Install Vinyl Sheet Flooring, DIY

Cut strips for the entire area using the same process, and then attach them all together with the painters tape. We taped the front and back for added stability. Make sure to label the top side so that you don't accidentally cut your vinyl layout upside down.

Elizabeth Burns Design | Step by Step Guide on How To Install Vinyl Sheet Flooring, DIY

create the subfloor

You will want to make sure the subfloor you are putting the new vinyl on is well-prepped. If you are putting vinyl over existing vinyl, then you can skip the new subfloor step. I would, however, recommend cleaning the existing vinyl VERY well (sweep, vacuum, mop, repeat). If you are like us and working with plywood subfloors, you will want to lay down another layer of subfloor (I know, trust me, I fought Brian on this step, too) in order to ensure that the surface the vinyl will lay on is free of imperfections that might show through. Any bumps, dips, or seams surprisingly WILL show through, and after doing all of this work, that is the last thing you want.

Lay your template on top of the 1/4" plywood, then trace around the template. Don't forget to trace those cutouts for the vent, toilets, etc, too. If you are working with a larger room, you may need to use multiple sheets of plywood. Once they are traced, set your plywood on top of the saw horses and use your jig saw to cut them out.

Elizabeth Burns Design | Step by Step Guide on How To Install Vinyl Sheet Flooring, DIY

Once everything is cut out, you will want to fit it into place in the room. When you are happy with how everything fits, grab your hammer and nails. The manufacturer recommended placing nails 3" apart on the perimeter, and then 6" spacing throughout the rest of the sheet. It seems like overkill, but I am glad we followed the instructions as it will prevent squeaking down the road. This process is pretty dang loud.

Elizabeth Burns Design | Step by Step Guide on How To Install Vinyl Sheet Flooring, DIY

Once everything is nailed down and secure, fill in the cracks with wood filler. This will need to cure for at least six hours. Once dry, sand it down very well so that the gap is seamless. Any little hump or bump might show through.


put down adhesive

After everything has dried, it is time to paint on the releasable adhesive! This stuff is pretty cool as it acts like a glue, yet it allows the vinyl to be re-positioned and easily removed in the future. It is great for first-timers like us who are prone to make mistakes. In a weird way, it kind of smells like Egg Nog.

Elizabeth Burns Design | Step by Step Guide on How To Install Vinyl Sheet Flooring, DIY

Roll the adhesive onto the floor just like you would roll paint on the walls. I would try to get as close to the edges as possible. Let this set for 45-60 minutes until it is tacky.

Elizabeth Burns Design | Step by Step Guide on How To Install Vinyl Sheet Flooring, DIY

cut the vinyl

Now we can move on to the fun part! While the adhesive is drying, take the same templates from earlier and place them onto the large vinyl sheet. Make sure they are the right side up! Lightly tape them down to prevent sliding.

Elizabeth Burns Design | Step by Step Guide on How To Install Vinyl Sheet Flooring, DIY

Using the box cutter, carefully cut around the template through the vinyl. I would leave about 1/4" extra on all sides. You can always trim down, but you can't add more vinyl back!


install the vinyl

Once everything is cut out, roll your vinyl up to make installation a bit easier. Starting in the corner, place the flap of the vinyl that is not rolled in place on the adhesive, and then slowly start rolling out. If the vinyl becomes unaligned, simply peel it back up, and start again. We used a scrap PVC pipe like a rolling pin to smooth out any air bubbles.

Elizabeth Burns Design | Step by Step Guide on How To Install Vinyl Sheet Flooring, DIY

That's about it, friends! The last steps will be to install baseboards and quarter-round, and then caulk everything to make sure it is water tight. I will say, we had an unexpected flood of water while we were installing faucets, and this floor held up like a champ. :)

I hope this was helpful, and if you are reading this part, thanks for making it through with me to the end! Feel free to email me with any questions at all.

Kitchen and Dining Lighting | Myrtle House

We had another productive weekend at the Myrtle House! I am convinced that renovating a house might be the best workout out there, because man, am I sore today! This is mostly due to the fact that we started installing the vinyl floors in the bathrooms (lots of squats, y'all!), and I will post about that process later on this week. For now, I am so excited to show you guys how the lighting turned out in the kitchen and dining room. The amount of lighting in this space is on point, and I think this area is going to be so lovely when it is all wrapped up... whenever that might be!

This first photo is of the kitchen. The oil-rubbed bronze and crystal chandelier will be above a small eating area, and the gold and crystal chandelier on the other side of the fireplace will be the dining room. Please excuse my husband's derriere! :)

Elizabeth Burns Design | Kitchen Lighting - Old House Renovation/Flipping

In the kitchen, we did a mix of recessed lights with a couple of oil-rubbed bronze fixtures (one chandelier and one flush-mount). I love the contrast between the dark oil-rubbed bronze and crisp, white-ish beadboard ceilings.

Elizabeth Burns Design | Kitchen Lighting - Old House Renovation/Flipping

And here are a few shots at night!

Elizabeth Burns Design | Kitchen Lighting - Old House Renovation/Flipping

In the little nook beyond the beadboard arch will house some base cabinets and the kitchen sink. The flushmount will be right over the sink.

Elizabeth Burns Design | Kitchen Lighting - Old House Renovation/Flipping

And here is the chandelier in the dining room. I took off most of the crystals so that they wouldn't be damaged during installation (you can see it all put together here), but I LOVE how this light looks in front of the brick. You can also see a peek at the vinyl flooring flattening out below. No vinyl for this room :) ; we are going to attempt to match the old existing hardwood in here that will continue into the kitchen.

Elizabeth Burns Design | Kitchen Lighting - Old House Renovation/Flipping

We were actually able to sleep in the house for the first time ever since starting this project in January of last year. That felt like quite a milestone! It is really exciting to see it all slowly starting to come together.

Inexpensive Faux Tin Backsplash

I was organizing photos in my computer recently (something I oddly enjoy very much) and came across a photo of our little Brooklyn Street Kitchen cabinets pre-makeover. I realized what a difference the backsplash really made! Here is the before:

Elizabeth Burns Design | Brooklyn House Faux Tin Backsplash Budget Kitchen Makeover

And the after:

Elizabeth Burns Design | Brooklyn House Faux Tin Backsplash Budget Kitchen Makeover

While I find the mint green appliances charming, some people might not agree with me, and I think the tin backsplash allows the dated fixtures to blend in more. It also adds some character to the kitchen; it looks like it could have been in the house years and years ago.

Elizabeth Burns Design | Brooklyn House Faux Tin Backsplash Budget Kitchen Makeover

Installing the backsplash was a snap. It comes in sheets that you simply cut with a razor, then put in place with a very strong adhesive tape. There is also a matching trim you can buy to make the backsplash seamless with the countertop and under the cabinets. Here is the installation in action.

Elizabeth Burns Design | Brooklyn House Faux Tin Backsplash Budget Kitchen Makeover

We had the sheets up for about a year and a half before we moved out, and it held up very well. I was a little nervous with having it so close to the burner, but it was no problem at all.

Elizabeth Burns Design | Brooklyn House Faux Tin Backsplash Budget Kitchen Makeover

What is your favorite go-to backsplash material? Ever tried something similar to these panels?

Kitchen Finishes | Rental Properties

I apologize for the impromptu blog hiatus! Our personal life was thrown a curveball, and I have been pre-occupied with some of those things. However, I am excited to share this post with you lovely people today! One role Brian and I have found ourselves in lately is that of Landlord, which is both exciting and daunting. On one hand, it is one step further towards creating future retirement income for us. On the other hand, we are responsible for maintaining the shelter for other human beings. This means that if something unexpectedly breaks, it is on us to fix it, no matter what. Sometimes these repairs can be pricey (such as plumbing problems or replacing an A/C unit), so I think it is important to be proactive and prepare your rental home as much as possible for the wear and tear of renters. In most cases, I think renters are respectful and take care of the space they are renting, but there are a select few out there who don't seem to care about getting their deposits back...

The Sea Spray Condo gets a lot of turnover being a seasonal, weekly rental property. In addition, it is on the beach, which means vacationers dragging in lots of moisture and abrasions. We needed some durable finishes for this place, so when helping my parents update, I did a lot of research. I think the perfect rental property is a combination of pretty and durable, especially rentals at a lower price point. You want the design to be inviting in order to entice potential renters to showings, but at the same time, it HAS to be durable. Otherwise, you will spend thousands of dollars each time a renter moves out making repairs. Not fun, and definitely not profitable.

Below are some basic finishes that I think are right on trend, affordable, as well as durable to keep both you and your renter happy!

Elizabeth Burns Design | Rental Property Finishes- income property, real estate investment, house flipping, shaker cabinets, grey wood floors

Cabinets // Kitchen Faucet // Flooring // Sink // Refrigerator // Chandelier // Countertop // Knob // Pull

  • FLOORING: It gets a bad rap, but I have to confess, it is hard to beat vinyl sheet flooring. This product has come leaps and bounds from the days of mustard yellow vinyl flooring. They now have vinyl that looks like marble hex tile, and actual planks that look, feel, and install just like hardwood. Tile is durable and looks great, but the grout inevitably gets dingy, and if a tile cracks, it is difficult to repair. Plus, the upfront cost is pretty hefty. If you need new flooring for a kitchen or bathroom, please consider this super durable option.
  • CABINETS: Everyone loves solid hardwood cabinets, and depending on your location, they may make sense in a rental. In general, I think a cheaper, white cabinet is the way to go. The one pictured above is a trendy Shaker style, which buyers will appreciate, but it is also a laminated cabinet and super easy to clean. Since they are so inexpensive, it would be easy to swap out one cabinet for a new one were it go get dinged.
  • COUNTERS: Granite is great, and marble is even better in my book, but both of these items still require at least yearly maintenance, which can be tricky to take care of when a renter is in the home. If your property rents for $1200 or more, I might splurge for granite, as most renters probably expect it. PLEASE, do not use marble. I am just as obsessed with marble as the next gal, but one red wine ring on unsealed marble and game over. On the Myrtle House counters, we are using this lovely laminate that has the look of Soapstone. It is super cheap, easy to install, and practically indestructible. We once accidentally set my parents' laminate counters on fire (true story) and it didn't even leave a mark. Hard to beat that. Plus, it is virtually maintenance-free.
  • FIXTURES: One thing not to skimp on, in my opinion, are plumbing fixtures. Water can cause so much damage to your home if not fixed immediately, so investing in quality faucets, shower heads, and toilets is worth it in the long run. If you have a leak in a shower, it can cause wood rot and mold behind the tile, which is a costly repair. I would also recommend going with a matte finish on the fixtures to hide fingerprints and signs of use.
  • LIGHTING: I think lighting is definitely a fairly inexpensive way to upgrade your rental and impress tenants, but I would make sure the lighting fixtures are durable. I would not, for example, install your Grandmother's heirloom crystal chandelier in a rental. Sooner or later, it will probably be damaged or (heaven forbid) could be stolen. The chandelier above looks expensive, but is actually made of acrylic, so it is less likely to chip or break.
  • APPLIANCES: While it seems that just above everyone wants stainless appliances, I am not on board with having them in a rental. They scratch and are kind of high-maintenance to keep that shiny finish sparkling. Also, in all honesty, I am kind of over the stainless craze. Why not try something new? Black appliances are sleek, modern, and will show wear and tear much better than stainless or white appliances.
  • HARDWARE: This probably isn't too important, but I always try to select a satin finish on hardware. I don't want anything too shiny that would show fingerprints. I do look for something that has a slightly distressed/antiqued finish to disguise any imperfections the hardware will get while the tenant is in place.
  • SINKS: My first pick for a kitchen sink would be a sprawling farmhouse sink, but at $1000 a pop, it might not be a good option for a rental property. Porcelain and ceramic sinks can also chip and stain. A budget-friendly option is to go with a quality stainless sink.

I hope this is helpful! Any other fellow landlords have any other suggestions? I would love to hear them!

Ā 

Painting | Myrtle House

We were finally able to add a little color to the Myrtle House last weekend. It is finally starting to look like a livable house! With the help of awesome friends (one who also happens to be our contractor) we were able to get the whole house primed and half the house painted in one weekend. Not bad progress! I listed the paint colors here, and so far, I am so happy with our choices. The colors dried almost exactly as I had hoped. I often forget how far we have come, and when I see photos like the ones below, sometimes I wonder "what were we thinking?". We are definitely getting to the point where we can finally see some progress, and for that, I am so grateful. Here are a few before and afters. :)

Below is what used to be the kitchen, which will now be the master bedroom. We moved the doorway to another location, and removed the paneling & dropped ceiling to expose the original beadboard ceilings.

Elizabeth Burns Design | House Flipping

Here is a spare room that is now a guest bedroom. The doorway was moved over slightly to accommodate the en suite bathroom door. We had to remove the beadboard walls due to termite damage, but we salvaged the beadboard ceilings throughout.

Elizabeth Burns Design | House Flipping

Another shot of the master bedroom (painted!!). The one door now leads to the master bathroom which connects to the walk-in closet. The wood stove was removed and we will patch the brick. This room has the prettiest afternoon light and makes the new paint color (Sherwin Williams Magnetic Gray) the most soothing shade of blue.

Elizabeth Burns Design | House Flipping

Even though we had to get rid of the chimney for budget issues, the living room is slowly but surely becoming my favorite room of the house. It has views of the mountains outside of the original windows and is small enough where it feels cozy. Again, in here we removed the wood panelling and the dropped ceiling to take the ceilings back to nine feet high. We used Sherwin Williams Magnetic Gray in this room as well. LOVE this color.

Elizabeth Burns Design | House Flipping

Here is what used to be a storage closet (I think it was part of the back porch at some point) and now it will be the master bathroom. The ceilings in this room were pretty low, so we raised them up as far as we could.

Elizabeth Burns Design | House Flipping

Here is a before and after of the office. This used to be the rather large dining room, but we took about 1/3 of the room to add a closet and full Jack and Jill bathroom that connects to the kitchen.

Elizabeth Burns Design | House Flipping

Lastly, the once bedroom that we made into the dining room that will connect to the kitchen. Starting to get there!

Elizabeth Burns Design | House Flipping