Floor Plans

Electrical Plan | Myrtle House

We are making some progress on the Myrtle House! Plumbing is underway (I hear there is a giant ditch in our driveway right now - sorry neighbors), and next up is the electrical. It is exciting and daunting to have all new wiring going into the house. On one hand it gives us free reign to put outlets, light fixtures, and cables exactly where we want them. On the other hand, I am terrified I am going to forget something important. Hopefully, it will be smooth sailing. :)

Elizabeth Burns Design | Electrical Plan

This is probably really boring to most of you (my apologies) but I am so excited to finally be to this stage!

Framing | Myrtle House

Throughout this process of revitalizing the Myrtle House, I am pretty sure I have gone through approximately five floor plans. This is not because I am an indecisive person (which I very much am), but our plans for this house have changed over the last year of renovations. Initially, we were going to keep the layout basically as is to keep costs low. With the abundance of termite damage, we ended up replacing most of the studs, so we had to spend money on new walls regardless. Over the past few months, I have given different plans to our contractor, but this last one was decided as the winner and over the weekend we were able to see the framing up. Here is a quick little tour of the house layout.

When you walk in, this will be our formal dining room/entry. A bit unconventional to walk right into the dining room, but we knew it would work for us. This room felt cramped for a living room and I didn't like the idea of people being able to see right from the glass front door if we are watching TV. The big opening will hold the original French doors and will lead to the office/guest room. In this room is also a full bath and closet (shown here towards the right).

Elizabeth Burns Design

Still in the dining room, but now we are looking into the living room. The original plan was to leave this wall completely open, but due to the length of the span, building codes would not allow it. We ended up having to frame in narrow walls on either side, but I actually now love them and think they look more in line with how the house would have looked when it was built.

Elizabeth Burns Design

To the right of the dining room and front door through the new opening is the living room. This room also connects to the kitchen. Since the existing fireplace acts as a support, we are able to leave this space open.

Elizabeth Burns Design

You can see the corner of the doorway at the right of the photo above, but right off of the living room will be a powder room. This was originally a closet.

Elizabeth Burns Design

This is the view from the living room looking back into the dining room and front entry.

Elizabeth Burns Design

Next up is the kitchen! This room was previously used as a storage room, but was closed off like a bedroom. Under the three windows will be our sink, dishwasher, and cabinets the length of the wall. Where the ladders are will be the exterior door to the side (eventual) screened in porch and backyard. The framing next to the ladders will be where the stove, fridge, and more counterpace will be.

Elizabeth Burns Design

From the kitchen is a short hallway where you can access the two back bedrooms as well as the laundry room. To the left is the master, directly in front is the laundry closet, and to the right is the guest bedroom.

Elizabeth Burns Design

Going left into the master bedroom, here is what used to be the kitchen. We may eventually get larger windows, but for now, we plan on putting the headboard under the window to fill in that awkward space. The old brick chimney will be patched (hopefully) and probably painted to add a bit of texture to the room.

Elizabeth Burns Design

Now onto the master bath! Not a huge room, but enough space for a double vanity, tub/shower combo, and toilet. I love the slanted roof line that the master bath, closet, and guest bath will have.

Elizabeth Burns Design

The master closet is actually only accessible through the master bath. Brian didn't love this idea, but it was the only way to gain the maximum space in the bathroom (creating a doorway from the master bedroom would have eaten up about three feet of wall space). I think it will work. Again, not huge by today's standards, but it will be three times bigger than any closet we have ever had!

Elizabeth Burns Design

So that is the master! Now let's go back to the hallway off of the kitchen and go right into the guest bedroom. This is a small room, but it fits a queen size bed and dressing chest. I love the original tall windows in this room. The doorway visible leads to the private guest bathroom.

Elizabeth Burns Design

The window to the right is remaining. The other is being removed to accommodate a tub/shower and replaced with siding.

Elizabeth Burns Design

And here is one last shot of the kitchen/living room. Here I am standing in the small hallway from the bedrooms looking towards the front of the house. There is not enough room for an island, so we are going to center a little bistro table in front of the fireplace with a chandelier hanging from above. The perfect spot for a glass of wine while cooking dinner. :)

IMG_4167.JPG

So that is it! What do you think of the layout? I think it will work really well for us right now, and if we decide to have children in the future (or just host fun sleepovers with my niece). :)

Final Floor Plan (I Promise) | Myrtle House

I am sure you are sick of me talking about the floor plan (I am sick of it myself), but this is the last update, I promise! Framing starts in the next few weeks, so there is no turning back now. I am really excited for how it turned out. We managed to change this originally 2 bed/1 bath house into a 3 bed/3.5 bath, which I am pumped about.

Elizabeth Burns Design | Myrtle House Floor Plan

This one is not nearly as neat (my apologies) but here is a rough idea of what the layout used to be.

Elizabeth Burns Design | Old Floor Plan

As you can see, the previous layout was the epitome of compartmentalized. No flow whatsoever, just like an old house. I think it is a huge blessing in disguise that there was so much termite damage. To keep costs low, we had agreed to try and keep the layout as it was and just deal with the awkwardness. I am so glad we were able to move most of the walls in the end. The long wall going down the middle of house is the load-bearing wall, so we will keep most of this in place.

One thing we discussed with our contractor on our last trip is to remove the back door. It was making the layout impossible and we had to create a long hallway to keep access to it (i.e. lots of wasted space). For about $700 dollars, this door and two windows will be removed and replaced with new siding. We already have access to the back through a door in the new kitchen, and the windows that are going away are 1. ugly, and 2. located where closets will be. No harm, no foul. Here is a photo of what we are getting rid of.

Elizabeth Burns Design | Construction

The door and the two windows flanking it are going away. We will still have a window in the master bath (the short window on the left) and guest bath (out of sight in this photo). Where the door is now is where the new master closet will be. :) P.S. Do you notice the NEW wood going in? It is odd, but even having the new stuff in is starting to brighten up the space.

Elizabeth Burns Design | New Joists

Another joy of working with an old house is retrofitting the old doors. Brian, Jake (our contractor), and I spent Sunday measuring the salvageable doors, taking photos, labeling, and then I had to try and match them to appropriate places in the house. Since all of the doors are different sizes (of course), the crew had to know the dimensions of each for framing. D7 stands for Door #7. :) What is behind Door #7 you may wonder? A closet - exciting, I know. :)

Elizabeth Burns Design | Layout

Now I get to try and find a few "new" doors for the house from a Habitat Store. Any Raleigh people seen a good/affordable selection of antique doors locally?

New Floorplan | Myrtle House

Now that we have free reign with the floorplan, I have to get my butt in gear and figure this puzzle out. I was informed that the plumber is coming on Monday, so I only have this weekend to finalize everything. Yikes! Talk about pressure. Here is what I have, but since we are losing 4" on the perimeter of the house on one side to fix the structural issues, I have to remeasure this weekend to make sure it will all work and that you will be able to brush your teeth without having to stand in the bathtub. :) Wish me luck.

Elizabeth Burns Design | Myrtle House Floorplan

Sorry it is so light - I had to quickly draw this in pencil and haven't had time to put some ink on the plan. As you can see, we are taking down the wall between what used to be the living room and the bedroom and turning it into a combo living/dining room. It will open to the kitchen, which used to be another bedroom. The giant rectangle in the kitchen is the double sided fireplace. The previous dining room will be divided to make an office/bedroom as well as a bathroom, laundry room, and closets. Towards the back of the house will be the other bedrooms. The master will be in what used to be the kitchen. We will also turn the old gigantic pantry into a master bath and take a bit of room for the master closet. On the other side of the house will be the guest room. This will also have an ensuite and closet. I love this new layout so much more because I feel like there is a LOT less wasted space. We have more room to entertain, and I love how the side porch now opens up into the kitchen instead of the guest bedroom. What do you guys think? Anything you would change? I would love to hear your ideas! Speak now or forever hold your peace. ;)

[Actual] Floorplan | Myrtle House

One afternoon the last time we were at the Myrtle House, Brian and I mapped out a floor plan that is actually to scale (imagine that). It is hard to plan when you don't know exactly how big everything is, so a realistic floor plan is vital. Of course, everything is smaller than I thought it was in my head, and there are doors places where I need them not to be. Whomp. Next up is to get this baby digitized so that we can start moving stuff around. :) Any program recommendations? I don't have AutoCAD or Sketchup on my computer right now...

EB Loves Old Houses | Myrtle House Floor Plan

Floor Plan | Myrtle House

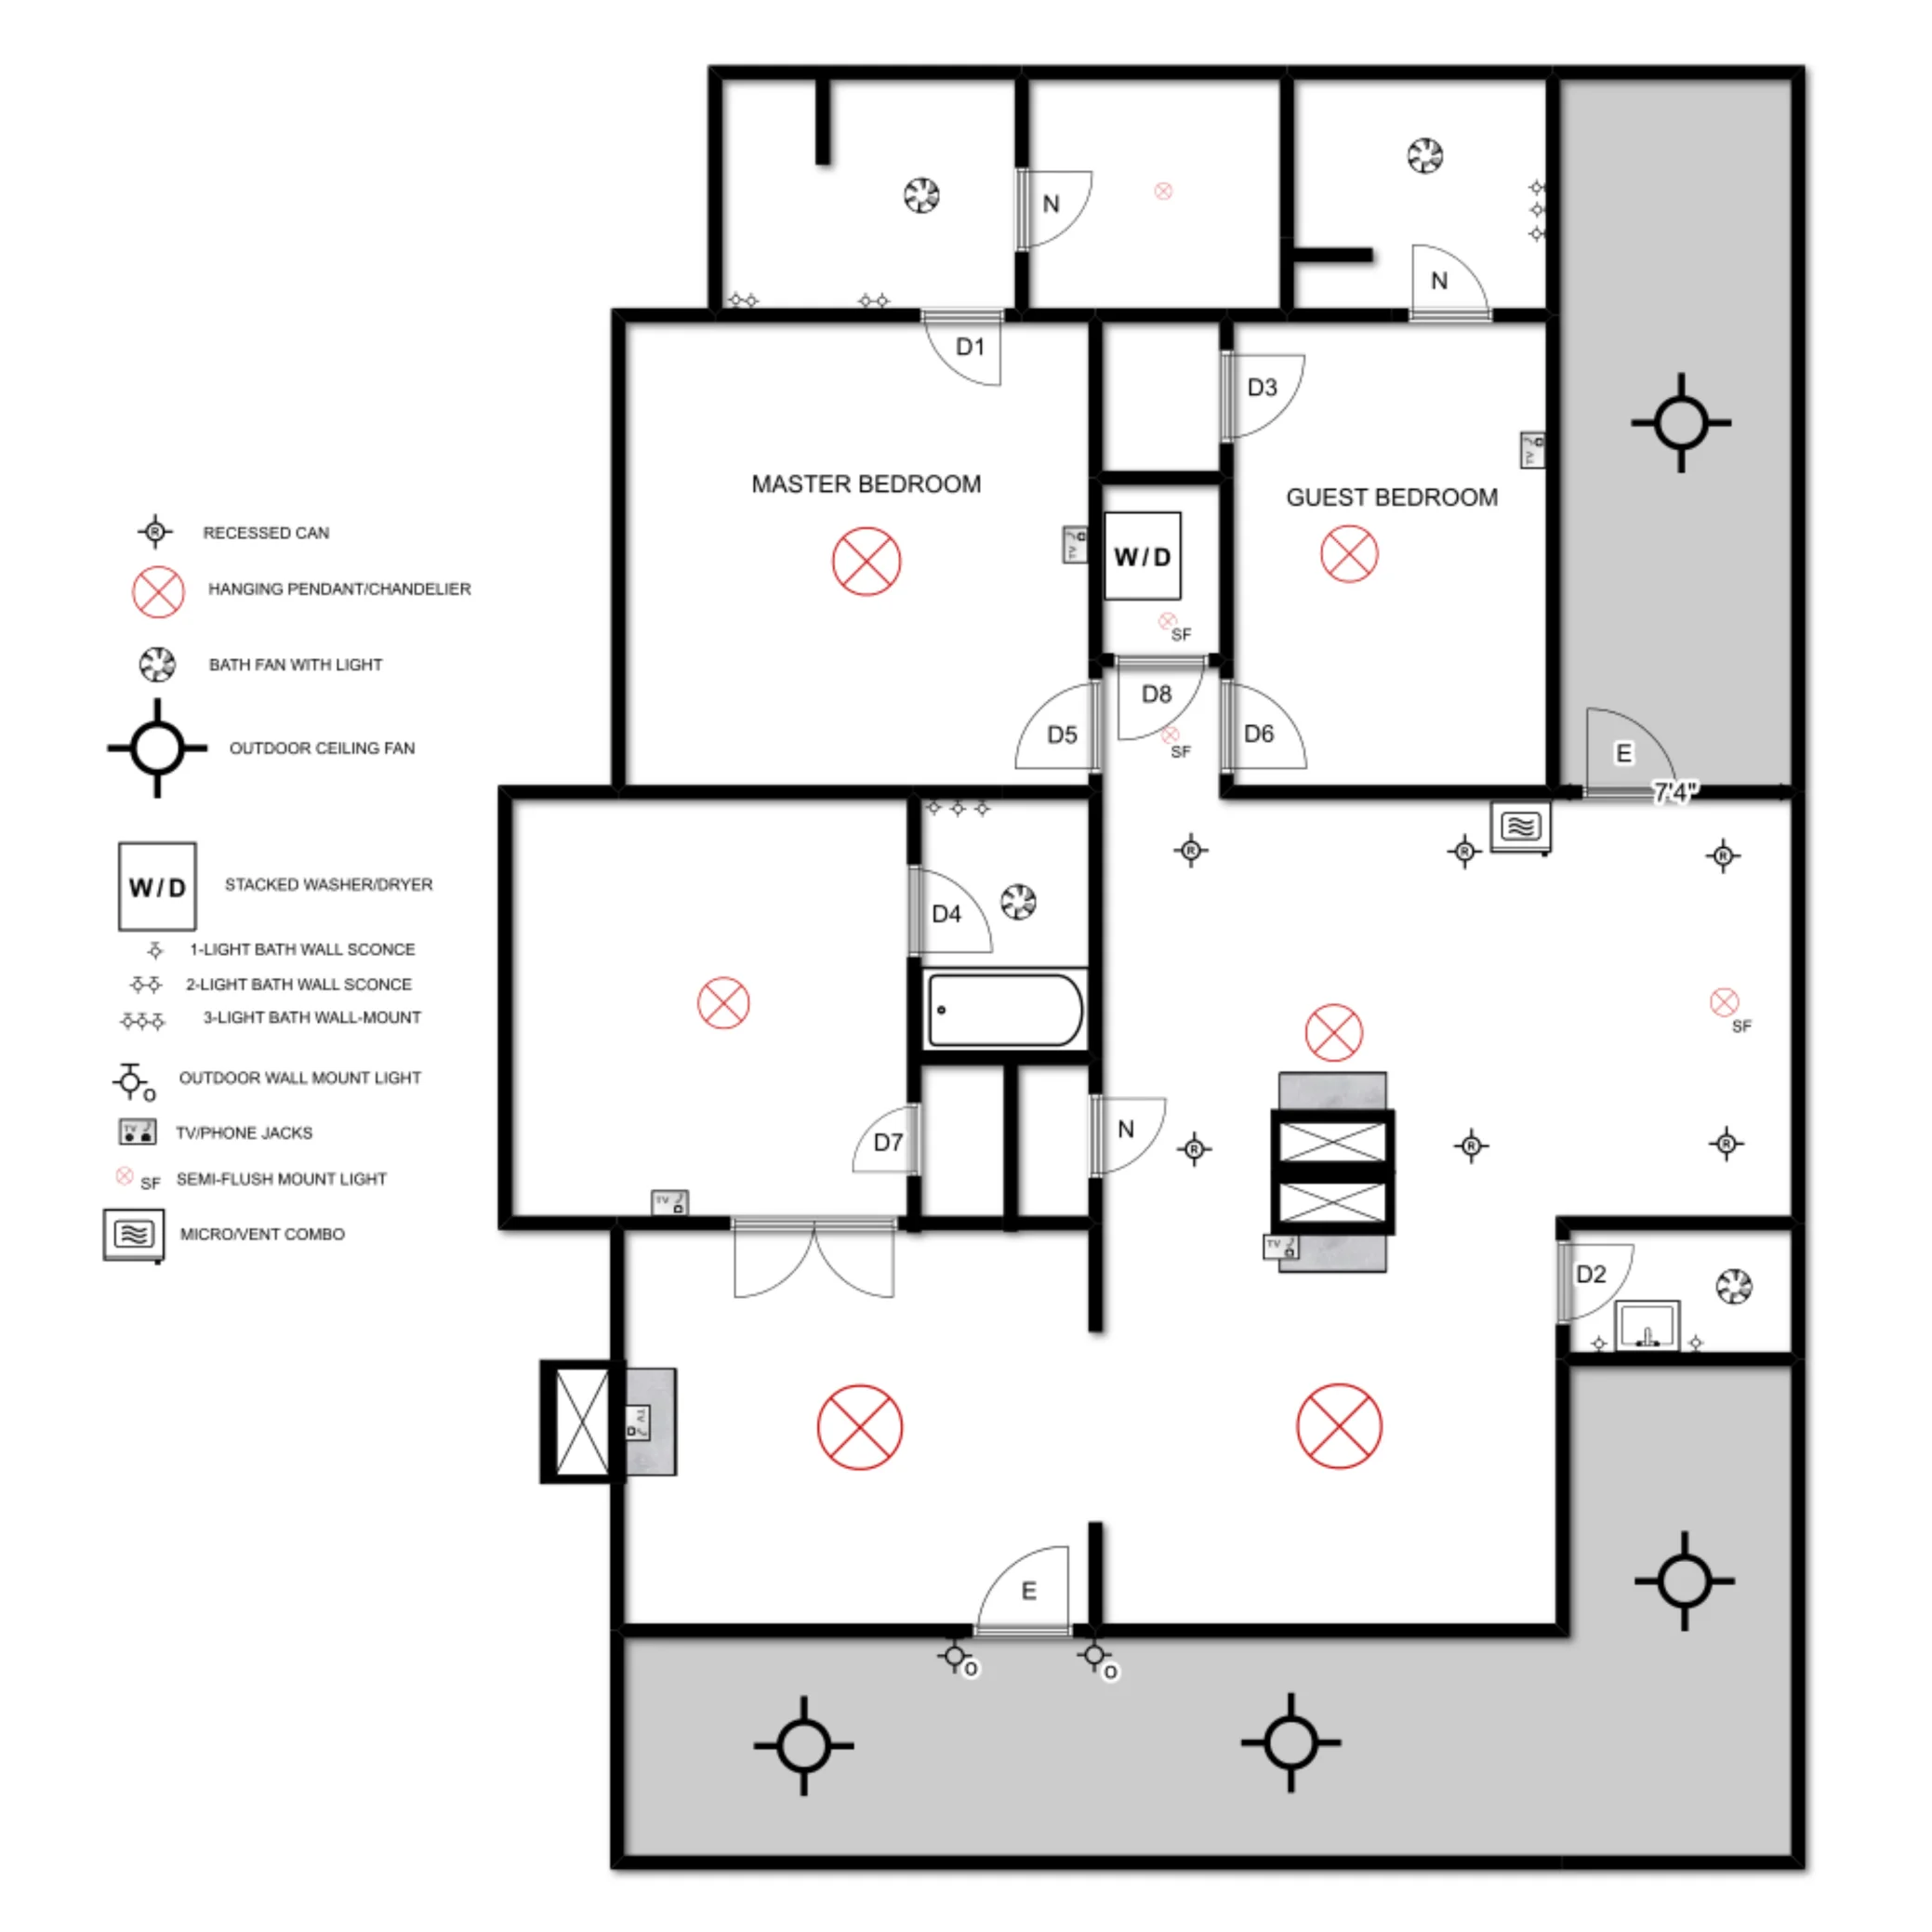
I still need to take exact measurements, but here is a rough idea of what the Myrtle House layout currently looks like and how I want to change it. Ideally, I don't want to take down too many walls (who knows what we would uncover in a 1901 house!). I showed the few modifications in red. Basically, I would like to expand the current bathroom and turn that into the master bath. We will have two sinks, which I think is key to a happy marriage. :) I will move the current door that leads to the laundry room so there is only access through the master bedroom. The wall that divides the bath and laundry needs to be re-built anyway, so this seems like an appropriate change. There is a large pantry at the back that I would like to turn into a full guest bath. Not the ideal location, but it is close to plumbing in the kitchen and the only area that it will fit.

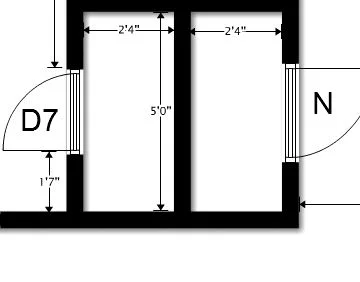
Have you noticed there is currently only one closet in the house and it is in the office? Yikes! While I would be fine with using wardrobes (I am not the kind of girl who HAS to have a walk-in closet), I know for re-sale and rental purposes we need some closets! I am hoping to sneak two small ones in where the existing doors are in the over-sized office.

Anything I am over-looking? I would love to hear what small changes you would make!

FLOOR PLAN.jpg