

This is a series of posts about our latest endeavor as newbie house flippers! We give updates every few weeks on our house flipping adventures that include timelines, budgets, problems, and before + afters. If you want to start flipping houses, I hope you'll follow along with this series!
Week 1
Weeks 2 + 3
Weeks 4 + 5
Weeks 6 + 7
Weeks 8 + 9
Update
Bathroom Before + Afters
Kitchen Before + Afters
Laundry/Mudroom Before + Afters
Living Room & Dining Room Before + Afters
Bedrooms Before + Afters
Truth be told, I spent more time than I expected figuring out this odd little yard and how to add curb appeal. The front of the house looked a little blah, but we didn't have the budget to do anything dramatic like repaint so I had to get creative on how to liven it up without spending much. The backyard was a hot mess (especially after we removed the old wooden ramp) but I think we came up with a budget-friendly and low-maintenance solution that the new owner will enjoy. Here is a summary of the projects we did:
- Removed storm door
- Painted front door
- Added door number decal
- Added new house numbers
- Transplanted roses from front of house to backyard
- Added hydrangea and gardenia to front of house
- Re-mulched
- Demoed old ramp
- Built new back landing/staircase
- Created new walkway to driveway
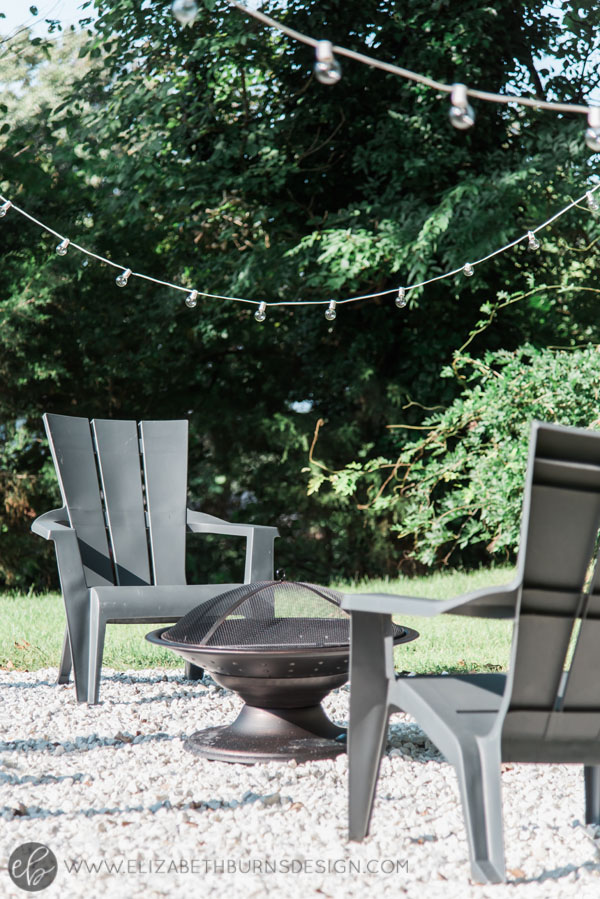
- Created fire pit
Below photos by Maggie Mills Photography


BEFORE + AFTERS
The front of the house was definitely the easier project to tackle. I removed the dated decor and the storm door to expose the gorgeous original wood door. Although a little brighter than I anticipated (I kind of suck at picking out bright colors), the new turquoise door adds a much needed pop to the otherwise vanilla exterior.

I added some clearance hanging plants ($3 each) to make the front porch look more inviting. We removed the sticker house numbers and bought larger ones to put over the front porch. The mailbox was placed oddly on one of the columns (wouldn't your mail get wet here?) so we relocated that to the right side of the front door. The concrete steps also looked like they had seen better days, so I staged with some extra terra cotta pots we had laying around and some more clearance plants (only $1 for each of these little guys). The terra cotta color helped tie in the brickwork. At the foot of the stairs, I splurged on some larger clearance planters ($7 each - high roller, I know) that helped to complement the front door color.

One of my favorite touches is definitely the decal on the front door. It looks kind of old-timey to me and adds a little bit of class and character that the outside was lacking. I really struggled with the idea of removing the storm door, but I knew that highlighting the original front door would appeal to buyers who love old houses so off it went. I did leave the door in the shed in case someone wants to reattach it at some point.

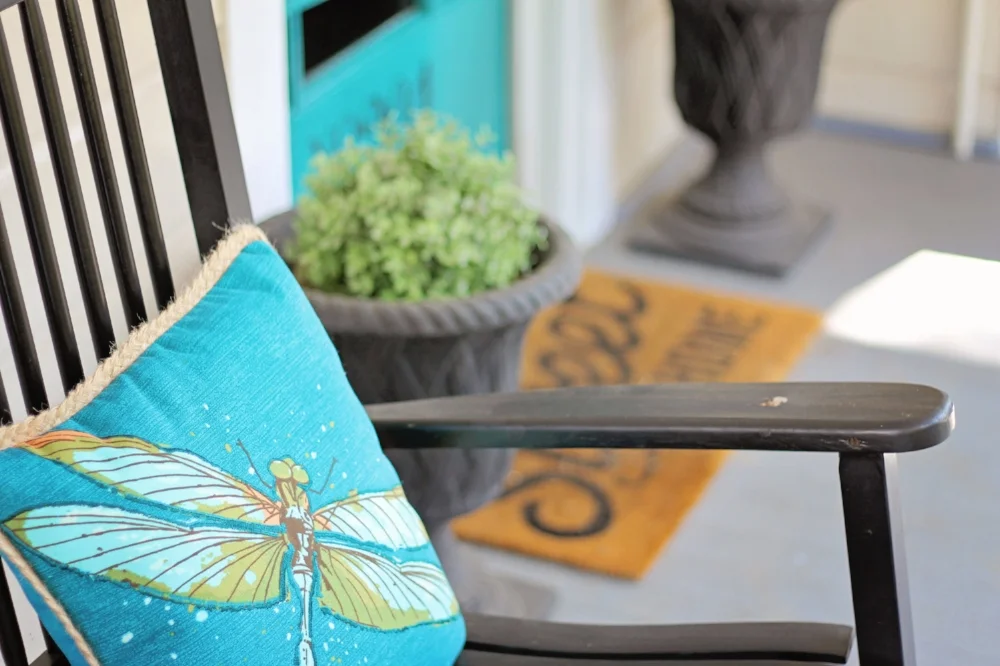
A front porch is such a quintessential part of an older home (especially in the South) so I wanted to accent this second living area with inviting rocking chairs and more pops of color. I found some exterior pillows at Lowe's that happened to match the front door color perfectly and I think the porch vignette turned out really cute. If you look closely, you can see how we repeated the same color on the inside with the dining room chairs. I'm usually one to go for more neutral colors, but it was fun to do pops of color on this house.

In the backyard, we spent MANY hours back here demoing, building, and hauling 100 BAGS of gravel. What we thought would be a weekend project out here turned into a multiple week project. However, in the end, I think it was actually worth it and definitely a selling point of this house. The old ramp was an eyesore and unsafe. We found out that it was built by a local high school's shop class, and they didn't use galvanized nails, so everything was rusting out making the whole structure unstable. It also took up half of the small backyard so it had to go. It did come in handy for getting large appliances in and out of the house during the renovation! We kept it up until the very end for this reason, haha.

This was Brian's first time building a deck so I'll admit I was a little nervous, but he did a really good job and passed all inspections! I didn't envy the math he had to do to get the stringer length and location right. My favorite part are the cute little caps we found at Lowe's that I think mimic the vintage metal awning.

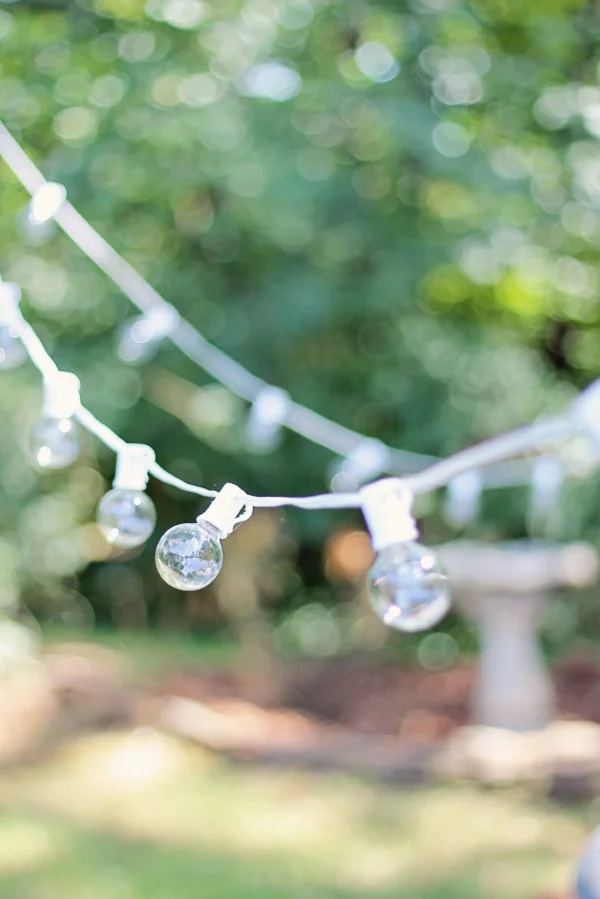
The ramp was actually quite long, and when we demoed it, the backyard was basically a mud pit. We came up with the idea to do a gravel walkway from the stairs to a new fire pit that T's off to the driveway. There was still a ton of old bricks at our house we had no use for, so we used them as a border of the walkways and fire pit (yay for free materials!). We also re-purposed the old 4x4s of the ramp to create a structure from which we could hang string lights. At night, it creates such a cozy atmosphere. We snuck over there one evening before we sold it to roast marshmallows with my brother and his girlfriend. :)

The biggest pain in the you know was the gravel. We initially bought 20 bags for the fire pit and the walkway thinking it was plenty, but that only covered about 1/3 of the walkway, haha. Those 20 bags was about all Brian's truck could haul, so we ponied up and paid Lowe's to deliver a pallet of rock (about 70 bags). Brian spread all of those out, and WE WERE STILL SHORT. He went back and bought five more bags. STILL NOT ENOUGH. An additional five bags later, bringing our grand total to 100 bags of gravel, and we got the area covered! We spent more than we thought, but I think the fire pit area was a good use of space.

COST BREAKDOWN
Weed Killer - $17.08
House Number Decal - $17
House Numbers - $5.37
Plants - $79.68
Planters - $14.22
Garden Soil - $6.36
Marble Rock - $339.24
Mulch - $20.24
Landscaping Fabric - $38.93
Landscaping Pins - $7.57
Fire Pit - $46.56
Delivery - $59
Outdoor Lights - $23.4
Deck Materials - $494
TOTAL - $1168.65
SOURCES
Door Paint - Sherwin Williams Green Bay
String Lights
Outdoor Pillows
Fire Pit
Vinyl Decal
That's all I have for the before and afters! We have officially closed on this house, so the next post will be the final numbers of everything including how much the renovation cost and what our profit was. :)