
While we were in our Brooklyn House for three Decembers total, we only decorated for Christmas once. Whomp, whomp. I love decorating for the holidays, but when you are in the midst of moving, it kind of falls down on the priority list. The one year we did get in the holiday spirit was the year we were on the neighborhood Historic House Tour which was a lot of work, but a lot of fun. To be honest, it was kind of awkward to have strangers pay to come into your home and judge it! Not sure we would do it again, but a cool experience nonetheless. :) Here are a few photos of our little cottage all decorated up!


DIY Door Trim for Plain Doors | Brooklyn House
I realize my most recent DIYs have been all about the outside of the house. I think I have spring fever! Let's take the focus back indoors. The Brooklyn House had the ugliest doors. The flat, boring, cheap retro doors that weigh about five pounds. Ugh.

Being partial/obsessed with French design, I have always loved the detailed paneled doors. In order to create this look, we bought flat beveled trim from Home Depot. I would make sure there is one completely flat side or else it will not sit flush on the door. Every door will be different, but we sectioned off three panels that were 6" apart and 6" from the sides of the door.

Brian traced an outline of each panel, and then cut each piece at a 90 degree angle and then pin-nailed into the door.


Once all of the trim pieces were nailed into place, we painted the new trim and doors with a few coats of oil-based paint. It took at least two coats, so grab a glass of wine for this project. ;)

I think they look 1,000 times better and was so much easier than replacing all of the doors. While not the original design of what would have been in the house, I think they add more character than boring, builder-grade doors. We also did the same treatment to our closet and I think they turned out great, too!

DIY Window Box | Brooklyn House
I always wanted a house with window boxes. There is something about them that is just so charming. When we bought our house, I knew a few little window boxes would help bring our little cottage back to life. While shopping around, the pre-made versions were well over $100 which were not in our budget. So we went the DIY route!

At AC Moore, I found these great 3' wide boxes that were the perfect shape. I can't find them online, but I believe they can still be found in stores in the wood craft section. I think they were around $15 each. I also purchased some basic 1/4" x 1" trim that we cut and nailed onto the top front and box of the window box. I painted the entire box (inside and out) in the same outdoor paint we used on our front door.
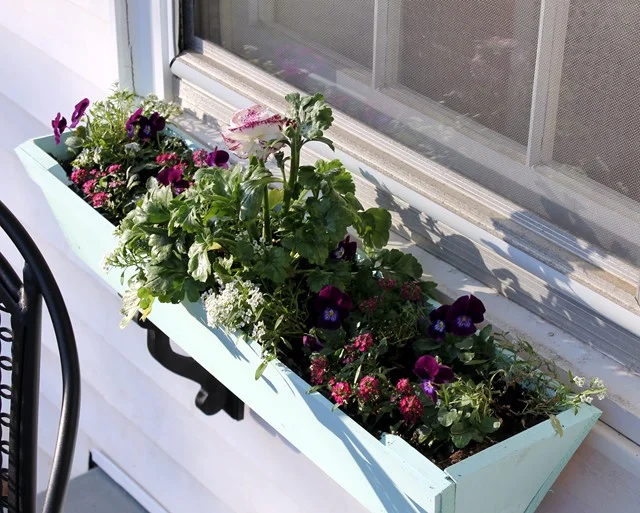
I also wanted to add a little more of a decorative element with the brackets that hold up the boxes. We purchased the same brackets that we used on the patio and spray painted them with Rustoleum Flat Black spray paint. We screwed these into the side of the house and they provided the perfect combination of pretty and practical support for our new little window boxes. I will be honest, I do not have a green thumb, and my pretty flowers died. I ended up replacing them with white faux flowers and those lasted a lot longer. :)
In total, I believe each box cost about $35. Not bad compared to the $100+ options! Plus, I got to paint them in my favorite color. :)
DIY Outdoor Cabana with Curtains | Brooklyn House
This project is one of the most pinned posts from my previous blog. Unfortunately, all of my photos were lost (thanks, Blogger) and therefore I had shut down my old blog. I know when I am on Pinterest and I find a DIY project I really want to try, I am always devastated when it leads to no-mans-land on the internet. Since this project is pinned so often, I wanted to create a new post (that links somewhere!) showing how we created this outdoor living space on a budget.

When we bought our house, we could see tons of potential in our backyard. It is an odd space: long and narrow with multiple levels and a retaining wall. Since we had very little entertaining space outside, we wanted to create an outdoor living/dining area for entertaining that could hold our rather large family. There was also this hideous exhaust pipe on the right that was really quite an eye sore.

To start, we removed the grass/weeds to create a dirt bed that still sloped away from the house. Brian then created a brick foundation where the four corners of the deck would be. We had purchased rustic treated wood planks at the Habitat Restore for a steal (75% off!) and used these for the frame as well as the boards on top. Brian made a basic frame and then nailed the boards on top. Once all of the boards were laid and nailed, he cut them down to size to create an even lip around the perimeter. Major kudos to him for this work - he only had a hand saw and hammer to work with!

After the deck was built and stained, we moved onto to Phase II - the cabana. Brian dug a few holes with a post hole digger at two corners of the deck. After spray painting everything in Rustoleum Black Flat Paint, we made a simple frame out of treated 10' posts, heavy-duty brackets, and a handful of 2 x 4s. I added the decorative scroll brackets to match the ones we used on the window boxes. A bit of a splurge, but worth it in my books.


Lastly, we added the curtains and rods. I used cheap cafe curtain rods and inexpensive 100% polyester sheer panels. I looked at outdoor curtains, but they were a bit too pricey. I knew that by going with the Polyester version, they would hold up and I could bleach any mildew off when necessary. Over a year later, they are holding up pretty well! I can't find the exact product anymore, but they would be similar to these in white. One thing I wish I had done is spray paint the curtain rods with a Rustoleum Clear Coat. These little guys have started to rust a little.
To cover that odd pipe, we purchased two sets of bi-fold doors for $10 (salvaged from the Re-Store) and attached them together to make a screen. I then painted them in the same color as the front door and distressed the finish to make it look a bit more weathered.

It was a while ago, so don't hold me to this estimation, but I am pretty sure we spent less than $200 on the entire project (we did score some major deals along the way). I always loved this little area. Whenever my parents came over, they always wanted to sit back there. Many a bottle of wine was consumed here over great conversation. :) Even when we rented our little house, the new tenants wanted to make sure we would leave the curtains for them. This is a labor-intensive project, but you will reap the benefits summer after summer! Feel free to email me if you have any questions or if I left something out. Has anyone attempted something similar? I would love to see photos!
Not Your Mother's Laminate | Design
Laminate countertops. I think Laminate is almost a four letter word to new home-buyers. While it is well known that granite, quartz, and the lovely marble are all components of a dream kitchen, don't cross off laminate quite yet. The new products out there for laminate are not what they used to be. So long are the days of Harvest Gold. Now we are onto products that make it almost impossible to tell without touching the material that is is not stone. Marble countertops have always been my absolute favorite. I had visions of an all-white kitchen smothered in giant slabs of creamy marble. However, we all know marble is one of the least practical options out there. It stains and scratches, and also costs an arm and a leg. I came across a blog post a while back that was titled "Kitchen Renovation on a Budget" and featured a gorgeous marble countertop. I thought - yeah, right... marble on a budget. That is an oxymoron. Upon further reading, I realized the blogger had used Formica Marble Countertops. What??!! What is this magical product? I literally had to do a double take at the photos. No way that is laminate.

Gorgeous, right? This is the Calacatta Marble from the Formica 180fx Collection. These patterns are different from traditional prints as they are actually blown-up versions of the real thing. It can be found at Lowes (make sure to check local stores for availability) and only costs around $100 for a 8' x 4' sheet. I have a feeling the price will rise as soon as this catches on!

Don't get me wrong, I love real stone as much as the next gal. However, there are certain scenarios where spending so much on a real slab just does not make sense. We are in that boat for the Myrtle House. While I would love to throw in sparkling stone, for the area and house, it does not make sense financially. We would never see that return on investment and would be over-spending for the area, We considered butcher block as another option, but the maintenance involved was less than appealing to me. Also, this house may one day be a rental property and I won't have to worry about them being damaged. These laminate countertops will last you a long time and give the grand look of marble without the high cost.
So what are your thoughts? Would you put these counters in your house or do you think I have lost my mind? ;)
Craigslist Chairs | Sea Spray Condo
My parents have this great little condo down at Atlantic Beach that originally belonged to my grandfather. It is one of my favorite places to visit and we have so many great family memories down there. Currently, my parents have it on the rental market and are looking to get some more weeks in the books. In order to do so, they are looking to freshen up the space and make it look a little more updated. They have already added a few great pieces, like a sea foam sleeper sofa and some other small upholstered pieces. Over the next few months they are looking to really transform the place and I am excited to help with and see the final outcome.
One thing that immediately dates the room are these dining chairs. They were purchased in the 1980's, and while very solid, do not scream "beach cottage" to me. :) These chairs are also very bulky and make the room seem small and heavy.

I found these cute little chairs on Craigslist for a steal - $75 for five. They are made by Universal Furniture, and I have always been impressed with their quality of furniture. I really liked the lines, scale, and wicker seats of these little side chairs. To me, they just oozed a sea side escape vibe like the Stanley Coastal Living Collection.

However, the previous owners had three little boy and you could tell that these chairs were well-loved! Since I wasn't crazy about the peachy taupe color, we decided to paint the frames a sea spray green to match the new sleeper sofa. Luckily, the seats easily screwed off, so that saved us a ton of time.


I used the Valspar Mellow Spring Spray Paint in Gloss and really liked it! The coverage could have been a little bit better (not sure I would use this to paint a black dresser white), but for a small color change like this, it was perfect. We ended up going through one can per chair (I tend to have a heavy hand) but I think it turned out pretty well! This line of spray paint has the best color selection I have seen by far and is worth checking out if you want to spray paint something a color other than white, black, or forest green. :)


By the time these guys were dry and we had the seats actually attached, it was pitch black outside so I don't have a final photo! We are heading to the beach next weekend, so I will take a better one then. :)