Kitchen Cabinets Makeover | Brooklyn House

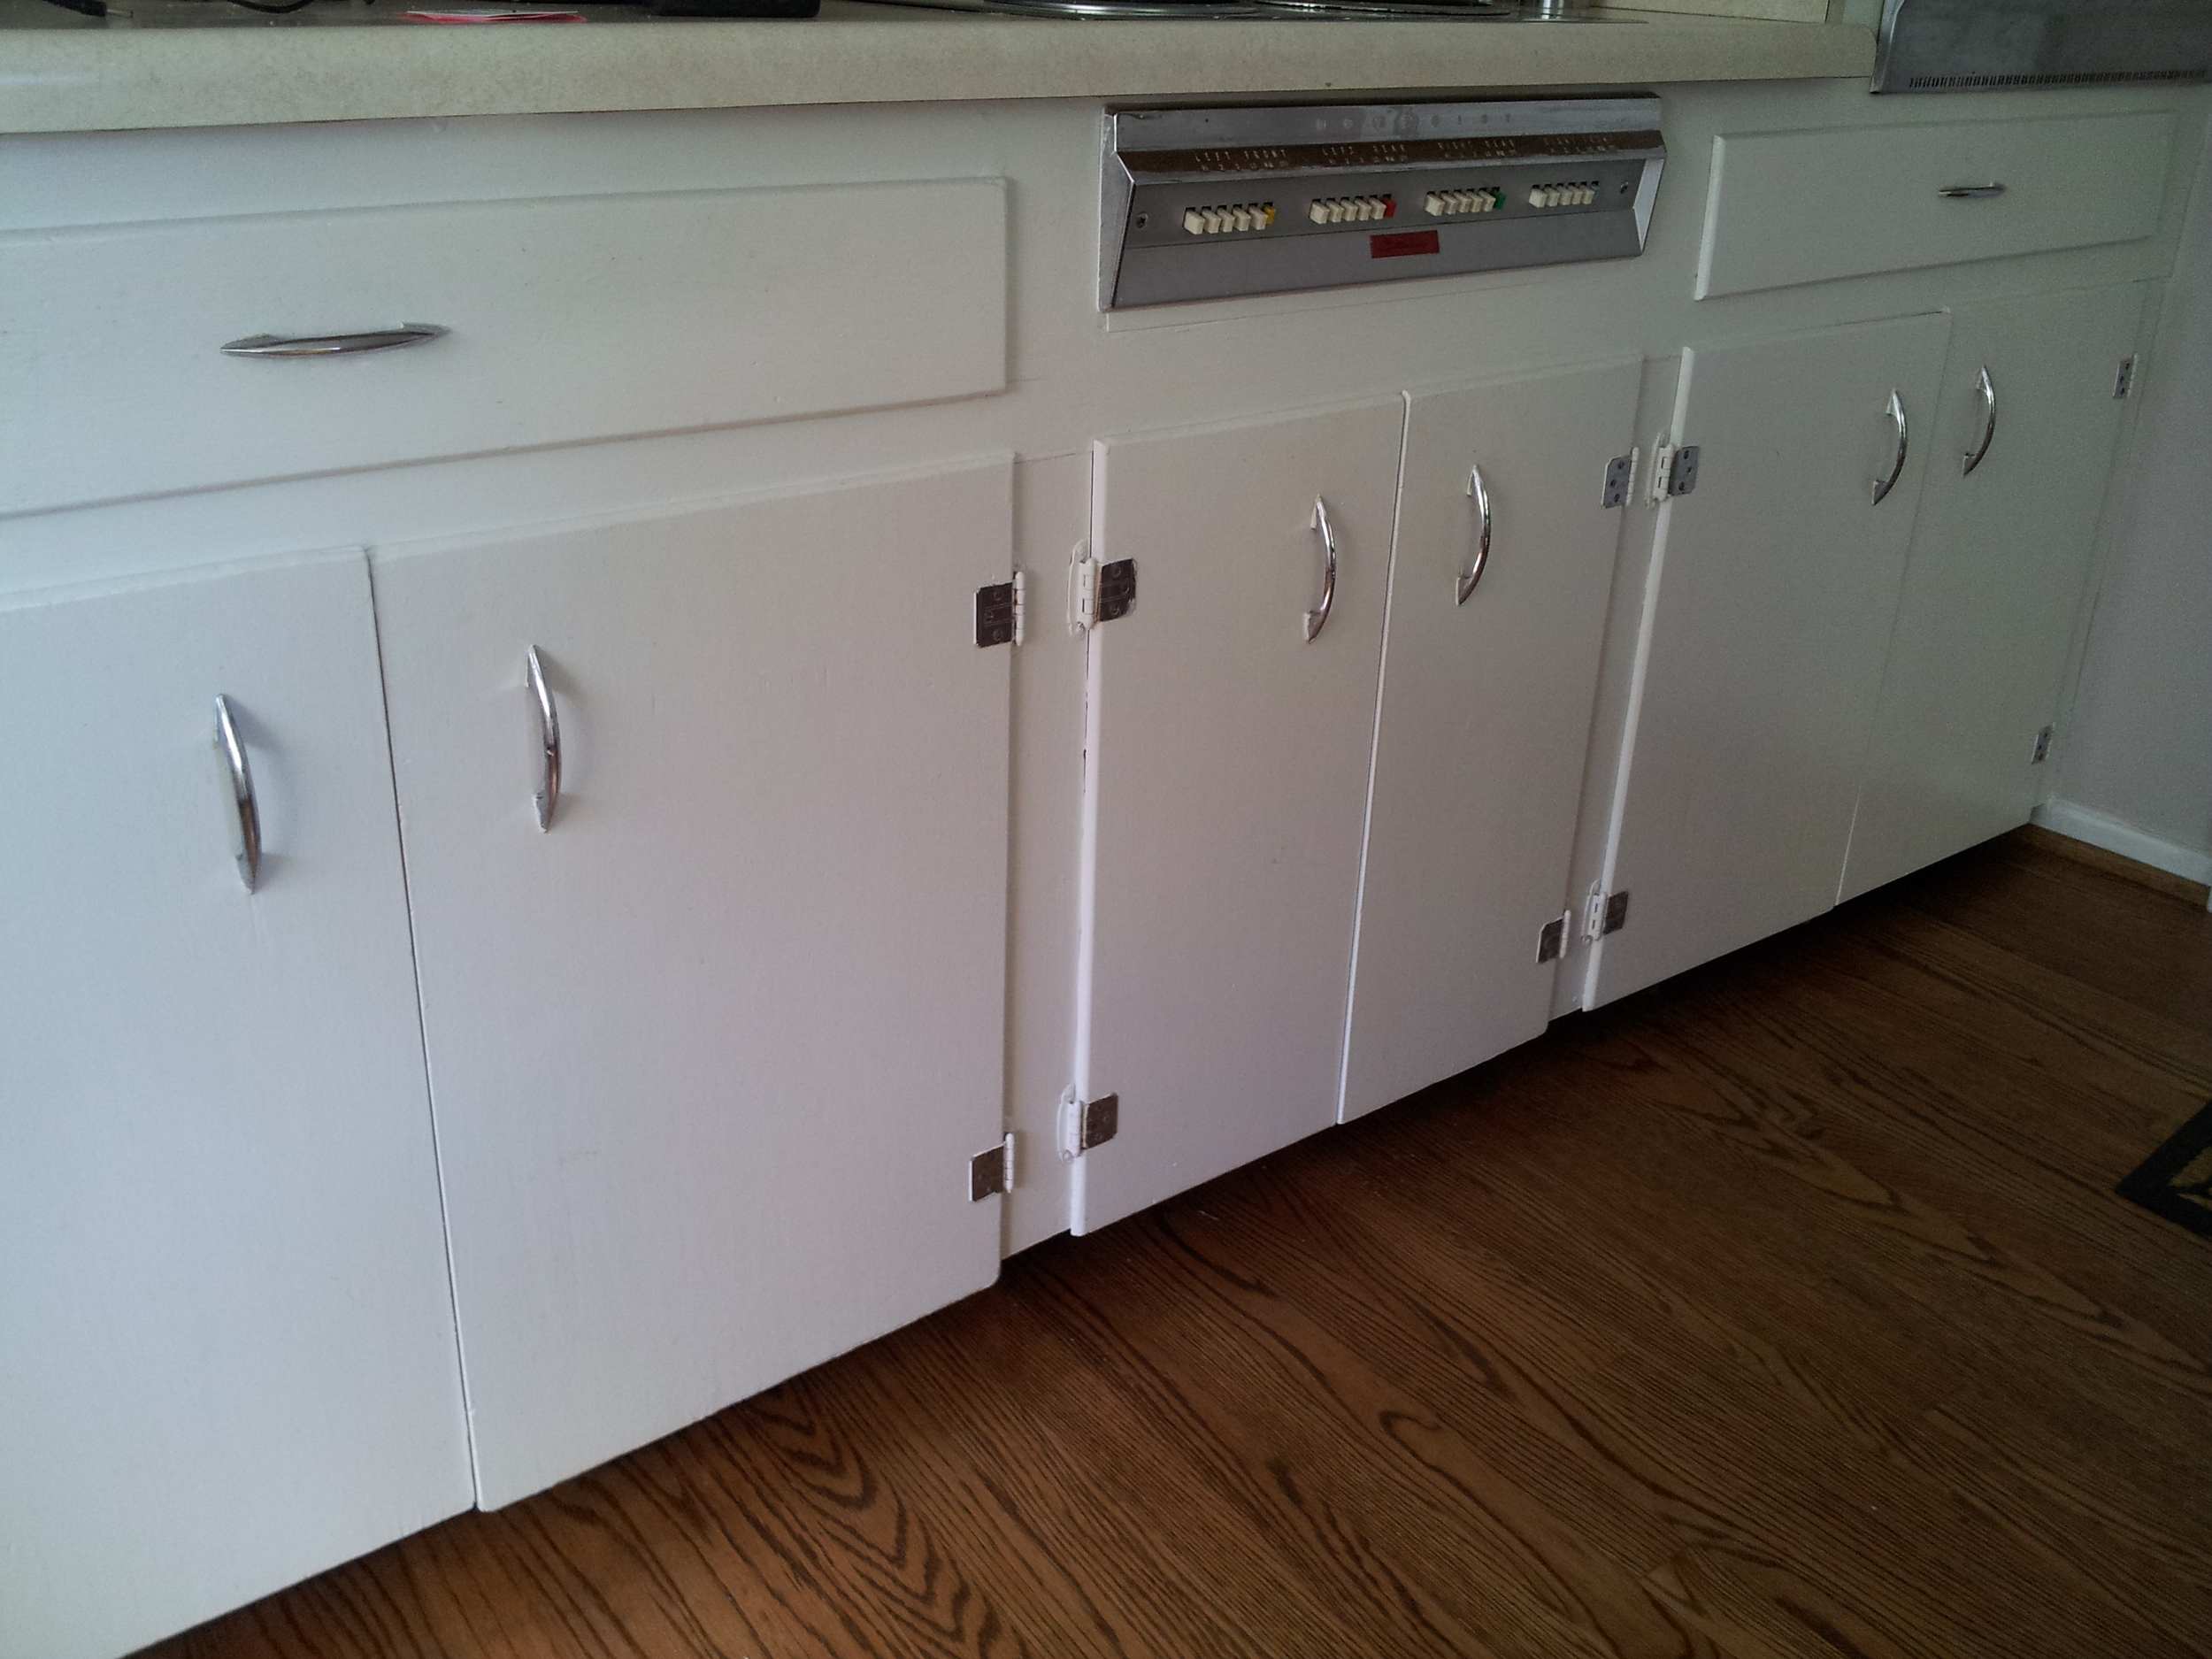
I really disliked our 1950s flat-panel kitchen cabinets when we bought the Brooklyn House. A lot. For one, the two sets of cabinets didn't match (the sink base cabinet was newer and had a completely different door/drawer style), and they were the flattest, most boring cabinets in the history of kitchen cabinets. Okay, I am being a bit dramatic, but they had to go.

EB Loves Old Houses | How to Add Trim to Old Cabinets

**This post may contain affiliate links in which I receive commissions and/or compensation for. I am dedicated to only sharing products and brands that I trust. Thanks for helping to support my blog!** 

I think a lot of people would have ripped them out. To each their own, but I wanted to save them. The cabinets are well-made, solid wood, and fit the layout well. Plus, we needed a budget friendly cabinet update as new cabinets were not an option. So they stay and get a DIY cabinet makeover instead. The great thing about the cabinets being flat is that it makes adding trim a lot easier.

We purchased 2" x .25" trim from HomeDepot for the doors. (In store, it is located in the decorative trim aisle.) On the drawers, we used a 1.5" trim to accommodate the satin nickel cup pulls. Make sure to measure the needed length of trim at least twice before purchasing. I think we made about three trips to the store. :)

EB Loves Old Houses | How to Add Trim to Old Cabinets

Brian cut the trim to size at a 45 degree angle. In retrospect, we should have just cut a straight line. That is how most Shaker cabinets seem to look, and it is a lot easier to measure that way. Oh well, learned for next time. To attach, we used small finishing nails like these. At first we tried glue, but it was messy and we didn't have enough clamps to make this an efficient way to attach the trims. The nails seemed to be adequate. When we removed the existing hardware, it left these ugly holes, so we filled those with wood filler. We also filled the corner seams for a more polished look. Brian likes buying wood filler in a tub instead of a tube because he says it is easier to use.

EB Loves Old Houses | How to Add Trim to Old Cabinets

We did the same treatment on all of the drawers. Same process here, except we didn't fill the old hardware holes since we were putting in the same size drawer pulls. Allow all of the wood filler to dry for at least 24 hours, and then come back and sand it smooth. I would recommend using a little palm sander on the trim. If you have to sand hardware holes inside the trim, you may need to sand it by hand.

One thing we did not do (but should have) is caulk the gap between the original drawer front and new trim. Duh. Make sure the caulk you use is paintable caulk. Some of the bathroom caulks can't be painted over and your cabinets will look messy. I would also recommend caulking any little nail holes so that they don't show through when paint is applied.

After drying for a day or two, we moved on to paint! To be honest, this was more time-consuming than putting on the trim. We used the oil based paint that the cabinets were already painted in, but we had to do two thick coats on all of the new trim to get the old and new wood to match. If my cabinets had not been painted yet and I was working with unfinished wood, I would use an adhesive primer (we love this one) and then a semi or high gloss enamel paint.

EB Loves Old Houses | How to Add Trim to Old Cabinets

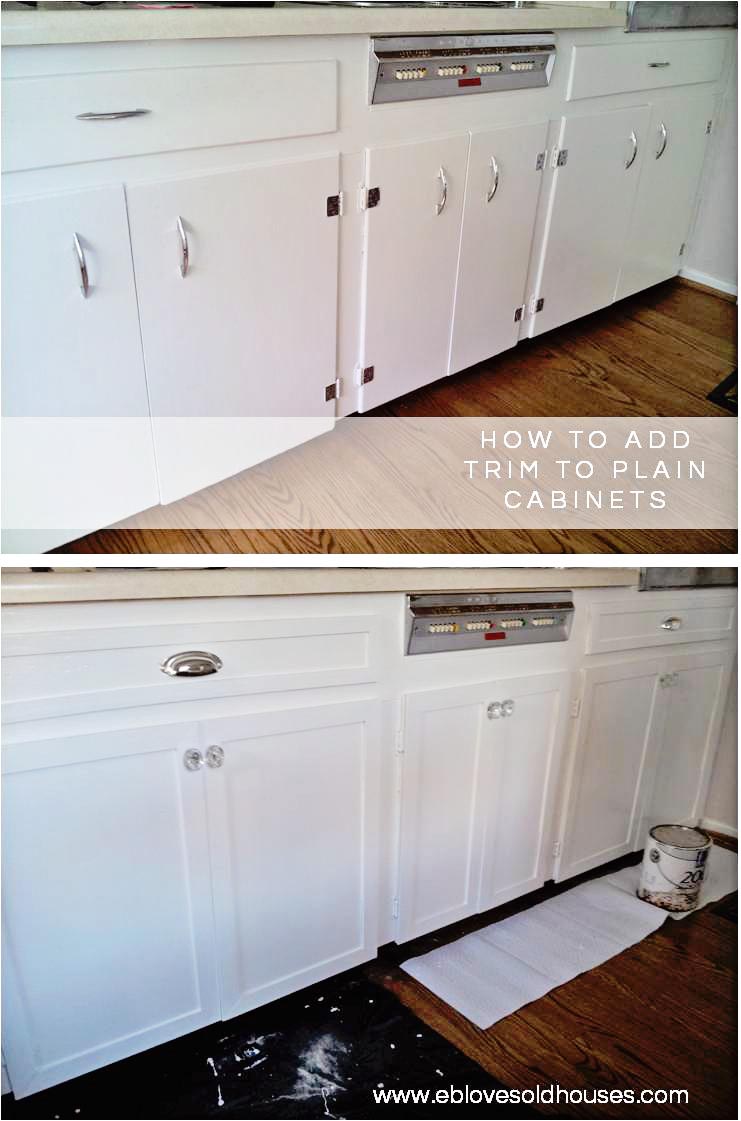
I think this easy DIY trim makes a world of difference! So much cheaper than replacing all of those cabinets. Also, a little hardware goes a long way. I splurged a little on these pretty glass knobs, and polished nickel pulls (discontinued, similar here) but I have no regrets. Here is the before and after side by side.

EB Loves Old Houses | How to Add Trim to Old Cabinets

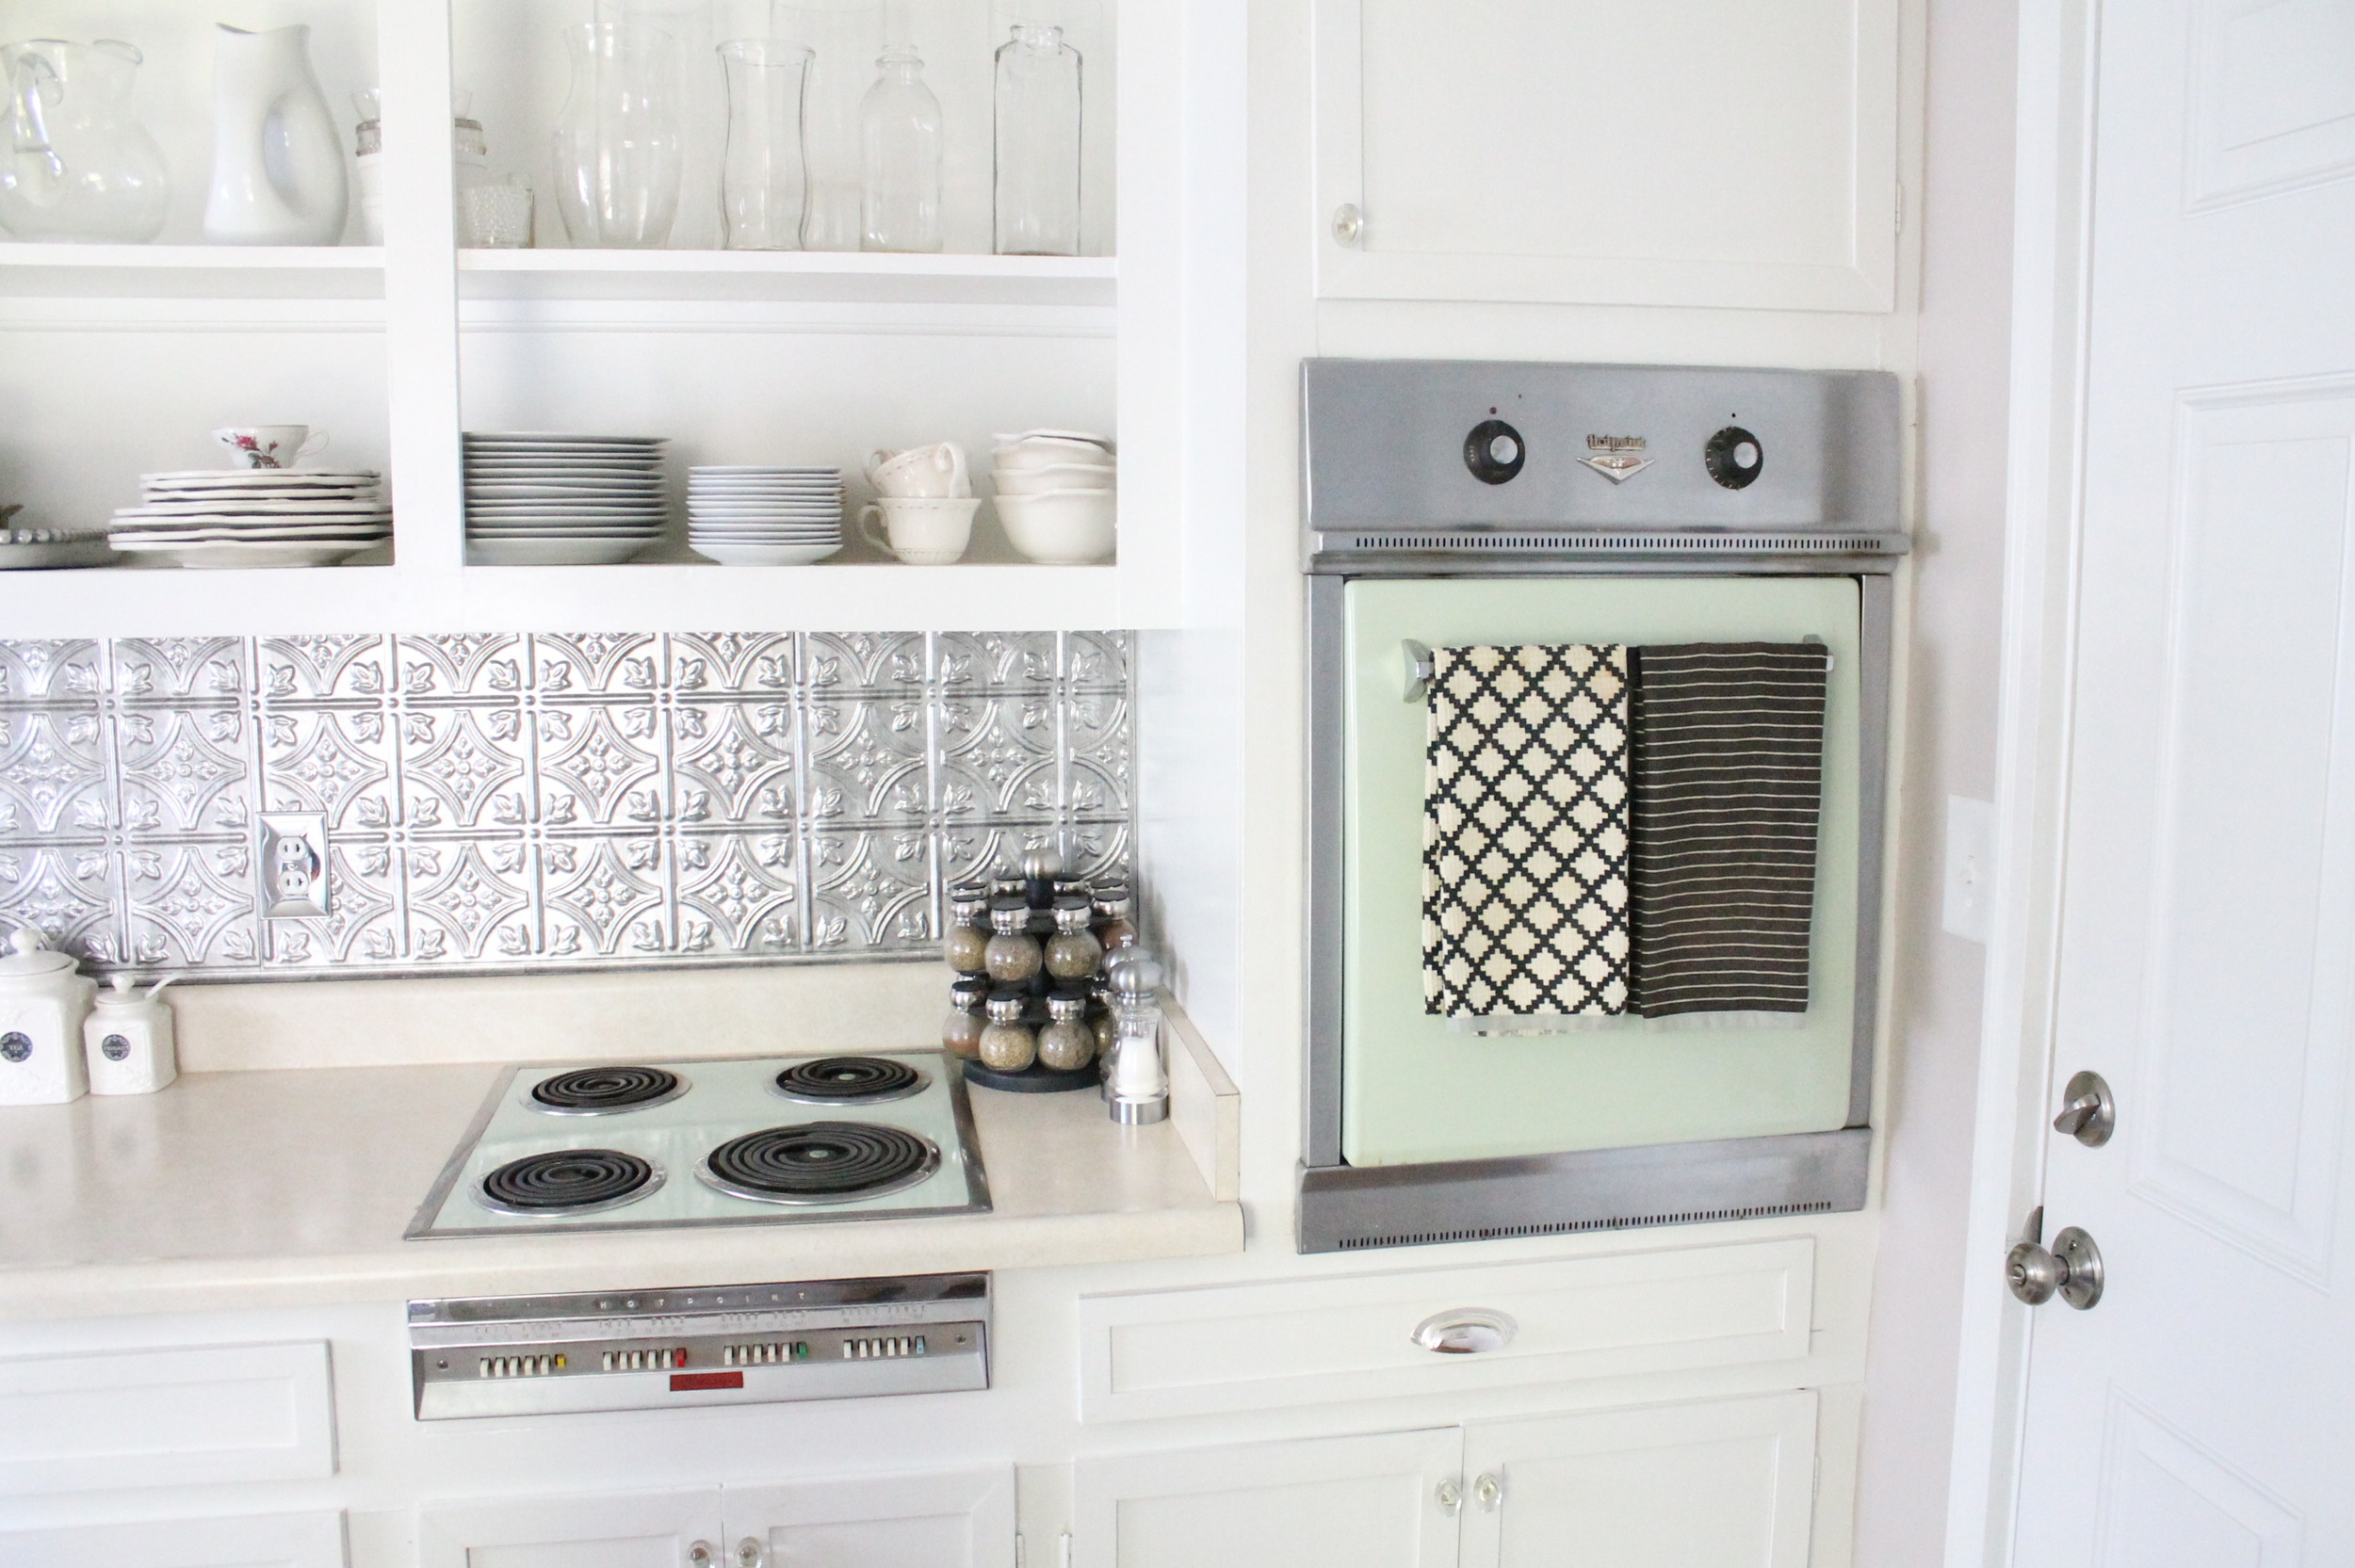
And here is the kitchen all done when we moved out. :)

EB Loves Old Houses | How to Add Trim to Old Cabinets

**UPDATE 8/12/2016 - Curious to see how these have held up? Check out this new blog post after nearly five years of use! Thank you for all of your comments and questions on this post. I am so happy this had been helpful!**

IF YOU'RE NEW HERE - HI!

I am so glad you found this little blog of mine. Before you go, I thought you may also like to check out some other popular posts:

Budget | Myrtle House

I don't know when or why talking about money became so taboo. To me, it is a very important topic in today's society that I think should be talked about often, especially with young adults (but that is a whole other blog post). One thing I was always curious about is how people afford and pay for restoring an old home. You have to purchase the home first, which is usually a hefty expense, and then you have to consider the costs to fix the place up (materials, labor, fees, etc.). I think one of the worst things that can happen is for people to buy a fixer-upper, and then underestimate the cost of restoring it. So today, I would like to share a bit of budget background for the Myrtle House.

It is important to note that we were fortunate enough to inherit the house from Brian's family. The only expense with the actual house is paying yearly property taxes. To be honest, if we had had to purchase a house, it probably would have been out of reach for us right now. I have broken down each task and *estimated* based on web research/forums. I then set up a rough timeline for when these items should be complete. I have Phase I and Phase II broken out - the first phase needs to be complete in order for move in.

EB Loves Old Houses | Old House Renovation Budget

I came up with this knowing that WE will be doing almost all of the labor. Please do not use this as a guide for your project as areas and houses vary so much. Our house is relatively small and we are trying to re-use most of the existing items in the house. It helps to get a local contractor to give you an estimate.

As you can see, we are already behind! I have a feeling I am going to look back on this original draft and laugh at myself when we end up spending $1000x more than this.

No, we do not have 50 grand laying around for a rainy day. Brian and I were very opposed to taking out any kind of loan for this project (our goal is to be debt free in the next two years) so we have made some sacrifices in order to save up. I am so lucky to have gracious parents who allow us to live with them during this renovation. We rarely eat out, are not planning any lavish vacations, and also run a side business to supplement our day jobs income.

So there we have a little bit of the money side of this reno. Is this something that interests any of you? I actually love talking about money (and how to save it), so I would be happy to continue posts like this. :)

DIY $4 Flower Arrangement | DIY

I used to hate fake flowers. To me, they looked cheap and tacky. If I was going to have anything resembling flowers in my house, they were going to be real ones. Then I grew up, got a job, and realized that having fresh flowers ALL of the time is pretty freaking expensive. And sometimes, you just want a little resemblance of nature in your house without breaking the piggy bank. One way to do this without going the fake route is to have a cutting garden in your yard. Camellias, hydrangeas, roses, peonies, and gardenias are great options. But, if you lack a green thumb or green space, here is a quick and easy arrangement that will only set you back four bucks.

EB Loves Old Houses | Easy and Cheap Flower Arrangement

I feel a little silly even writing a "tutorial" on this, so I will keep it brief. I hit up the Dollar Tree for three fake stems (two were the same flower), and then a simple, round glass vase. I cut them down so that the stems were only about an inch taller than the vase. This will make sure the arrangement looks to be nice and full.

That is it! I like these types of faux flowers near a sink, on a nightstand, or mantle. Just a place where you need a little sum'in-sum'in.

Painted Cabinets | Sea Spray Condo

Wow, what a difference a little paint can make! As mentioned earlier, my parents hired someone to paint the kitchen cabinets at their beach condo white. This past weekend, Brian and I went down to the beach to attach the hardware and address the backsplash. I was blown away with how much brighter and cleaner the once dark wood cabinets now look! It really looks like a completely new kitchen! Here is a little before and after (apologies for the phone pic).

Nice, right? It is hard to tell, but the backsplash (if you can call it that) was a grasscloth wallpaper in an ivory color. Here is a better photo of it a bit more close up. I had found this gorgeous tile backsplash that would have been PERFECT, but after measuring, I realized it would be about $300 in supplies. We are attempting to get the condo ready for prime rental season quickly and cheaply, so I tried to get creative on how to spruce up the walls without spending that much money.

EB Loves Old Houses | Grasscloth Wallpaper Beach Condo

The texture of the wallpaper was good, but the color was washed out looking and made the countertops and appliances look dingy. We recently refinished some Craigslist chairs in a pretty sea foam green color: Valspar Mellow Spring. To tie the chairs into the rest of the kitchen, we decided to paint the wallpaper the same color. It turned out pretty great! The painted wallpaper is subtle, but has a nice sheen and texture to complement the cabinets. It looks so fresh and bright in there now. Even with the older appliances and countertops, I think the overall look is still beachy.

EB Loves Old Houses | Sea Foam Green and White Beach Kitchen

I can't wait to get back down there and finish up the rest of the kitchen/living room. What do you think - do you like the look of painted cabinets? I know some people are very opposed; I would love to hear your thoughts!

Merrimon-Wynne House, Raleigh NC | Historic Houses

I have had a slightly abnormal obsession with the Merrimon-Wynne House ever since I spotted the "for sale" sign in front of it a while ago. If only I had a million or so dollars laying around, this beaut would have been mine! It is easy to see why I love this house. From the dapper black double front doors, ornate trim work around the multitude of porches, to the killer lot on an ideal location. Le sigh. I am so happy that someone else fell in love with this handsome home! Jodi and John Strenkowski purchased the house and fully renovated it to serve as a lovely wedding venue. Raleigh brides, be sure to check this one out on your venue search!

Here is the history on the home from the Merrimon-Wynne House's website: "The Merrimon-Wynne House was built in 1876 as the centerpiece of a park-like setting on N. Wilmington Street for Augustus S. Merrimon, a prominent Raleigh jurist.  At the time of his death in 1892, he was Chief Justice of North Carolina’s Supreme Court.  In 1899 Lula B. and A.F. Page (of the Wake County Pages) purchased the property from The Merrimon estate.  Soon after, her husband died, and Lula married J.S. Wynne, of Raleigh.  Twenty years later, in 1919, the Wynnes deeded the house to Peace College, and thereafter it became known as “Wynne Hall.”  It served its first stint as a dormitory from then until 1934."

All of the below photos were taken by Tim Willoughby Photography via Southern Bride and Groom.

EB Loves Old Houses | Merrimon-Wynne House

Pop Up Camper | Myrtle House

My parents used to drag us kids up and down the East Coast in their beloved pop up camper. As a know-it-all 13 year old, it was quite possibly the worst thing that had ever happened to me. I would sit in the van while my parents ooh-ed and ahh-ed at national landmarks and historic sites while I angrily listened to Christina Aguilera on my portable CD player. Sorry parents. :)

So, you can imagine my parents' surprise when I told them that Brian and I were buying a pop up camper. I am not exactly a camping person, but when trying to figure out the best form of shelter for us as we renovate the Myrtle House, it actually made the most sense. The house is three hours away from where we live and not inhabitable, so every time we head down for the weekend to work, we never get too much done since we have to pack up and head home the same day. With Lola usually in tow, a hotel is both expensive and cumbersome, so an itty bitty home away from home seemed to be the right fit.

We bought a fixer-upper of a camper (surprise, surprise) and, of course, I feel the need to decorate it! Obviously, the bulk of our budget right now is going to the house, so this will be a quick and inexpensive little makeover. Here is what I am thinking.

EB Loves Old Houses | Camper Inspiration - Yellow and Gray Chevron

We purchased vinyl plank flooring at Lowes. The one pictured is different in that it is a floating floor; we actually got a peel and stick plank. This type of flooring is just like peel and stick tile, but with the look of a wood or laminate surface. I think this product is really exciting and am eager to see how easy it is to apply and how durable it is under the wear and tear of a renovation.

I already had this fabric from a previous curtain project, so I will put it to use making curtains for the camper. It is a medium weight and hides light well so it should do the trick! I plan on using velcro to attach the curtain to the camper canvas and then a ribbon to roll them up in each morning. Easy peasy.

I found this little duvet set on clearance at Target (sorry, it is so old I can't find the link to it anymore!). It matches the yellow chevron fabric easy enough and was only $15. Done deal. I had some old gray sheets that match the whole little scheme pretty well.

The only other thing we are going to change is to paint the wood paneling in the camper. I swear, this stuff follows me! I want to meet the inventor of the wood panel...

I will be the first to admit, I am a newbie when it comes to all of this camping stuff. We won't have electricity for a while, so I am a little nervous about making sure we have all of the needed supplies! Any camping/camper advice you may have is welcome. :)