Neighbor Drama | Myrtle House

So we made a quick trip to the Myrtle House this weekend as one of Brian's childhood friends is expecting a baby and we were invited to the baby shower. Since NC has received a lot of snow this past month, we wanted to stop by the house and make sure it hadn't fallen in (sounds dramatic, but a validated concern). We were pleased to see the house is in fact still standing, but we did stumble upon another issue. A neighbor recently clear cut her backyard. There were giant old trees that she just demolished. I would have kept them, as they were lovely old trees, but to each their own. See the problem is, she cleared her yard and then dumped a big 'ol pile of trees into OUR yard!

EB Loves Old Houses

As you can see, this is not your average pile of brush and will be very expensive to move. So, we have the happy task of dealing with this not-so-nice neighbor in civil court potentially. :/

On the flip side, we were able to meet the other neighbor next door who could not be nicer! He was good friends with Brian's Grandmother and had continued to mow her lawn even after she had passed. We noticed he was building raised garden beds and even offered us his produce!

Ugh, have you ever had to deal with nasty neighbors? How did you approach the situation?

Exterior Inspiration | Myrtle House

It is no secret that I love a classic black and white color scheme on a house, especially on an old one. There is something so clean and timeless about this look. For the Myrtle House, the house already has white aluminum siding and black accents on the windows, so to me it is a no-brainer to leave it the way it is. I will also throw in some touches of light blue (of course) on the porch ceilings. The foundation and chimney also feature this gorgeous, rich, brick that is over 100 years old. You can't make brick like this anymore! We made the mistake of using brick pavers from Lowes for a path on the Brooklyn House and it looked terrible. If you ever have to replace brick on an old home, please source out old brick (check Craigslist) - it will be well worth the extra effort and look much more cohesive!

EB Loves Old Houses | Morganton Exterior Inspiration Board

1 / 2 / 3 / 4 / 5 / 6 / 7 / 8

The Myrtle House actually has the potential for lots of outdoor living space, including a wrap-around porch and a side porch we plan on enclosing to make into a screened-in porch. In the South, I think a screened-in porch is a must for the summer! We will also add a little picket fence to keep any doggies safe as well as add a bit more definition to the rather large front yard.

For landscaping, I plan on adding my favorites - a climbing rose bush over the front steps, garden roses lining the front porch, camellias along the side screened-in porch for privacy (and gorgeous flowers!), and hydrangeas on the opposite side next to the fireplace. In the back, I would love to create a small fire pit under the oak tree that is surrounded in a peony garden.

One of the things I regret from the last renovation is waiting so long to do the landscaping! We put this last on our priority list and never got to enjoy our hard work in the garden. I would love to prioritize this on the Myrtle House so that things actually start to grow and fill in before the house is move-in ready. We shall see - things like fixing the structure and broken windows seem a bit more important than my peony garden. ;)

The Tucker House, Raleigh NC | Historic Houses

As many know, the Tucker House in Raleigh holds a special place in my heart as this is where Brian and I had our wedding reception! I fell in love with the Neo-Classical Revival architecture - those stately columns, the romantic balcony, and a sprawling mahogany staircase.

EB Loves Old Houses | The Tucker House Raleigh

Built in 1915, this house belonged to Garland Scott Tucker (what a cool name!), his wife Toler Moore, and their four children. While the house was damaged by a fire in the 1930s, the original floor plan included a reception hall, library, radio room, telephone room and dining room downstairs, as well as the kitchen, bathroom and a butler's pantry.

EB Loves Old Houses | The Tucker House Raleigh

Look at the details in these columns! So pretty!

EB Loves Old Houses | The Tucker House Raleigh

Historic House Tour 2013 | Brooklyn House

While we were in our Brooklyn House for three Decembers total, we only decorated for Christmas once. Whomp, whomp. I love decorating for the holidays, but when you are in the midst of moving, it kind of falls down on the priority list. The one year we did get in the holiday spirit was the year we were on the neighborhood Historic House Tour which was a lot of work, but a lot of fun. To be honest, it was kind of awkward to have strangers pay to come into your home and judge it! Not sure we would do it again, but a cool experience nonetheless. :) Here are a few photos of our little cottage all decorated up!

EB Loves Old Houses | Simple Christmas Decor

DIY Door Trim for Plain Doors | Brooklyn House

I realize my most recent DIYs have been all about the outside of the house. I think I have spring fever! Let's take the focus back indoors. The Brooklyn House had the ugliest doors. The flat, boring, cheap retro doors that weigh about five pounds. Ugh.

EB Loves Old Houses | DIY Door Trim for Plain Doors

Being partial/obsessed with French design, I have always loved the detailed paneled doors. In order to create this look, we bought flat beveled trim from Home Depot. I would make sure there is one completely flat side or else it will not sit flush on the door. Every door will be different, but we sectioned off three panels that were 6" apart and 6" from the sides of the door.

EB Loves Old Houses | DIY Door Trim for Plain Doors

Brian traced an outline of each panel, and then cut each piece at a 90 degree angle and then pin-nailed into the door.

EB Loves Old Houses | DIY Door Trim for Plain Doors

Once all of the trim pieces were nailed into place, we painted the new trim and doors with a few coats of oil-based paint. It took at least two coats, so grab a glass of wine for this project. ;)

EB Loves Old Houses | DIY Door Trim for Plain Doors

I think they look 1,000 times better and was so much easier than replacing all of the doors. While not the original design of what would have been in the house, I think they add more character than boring, builder-grade doors. We also did the same treatment to our closet and I think they turned out great, too!

EB Loves Old Houses | DIY Door Trim for Plain Doors

DIY Window Box | Brooklyn House

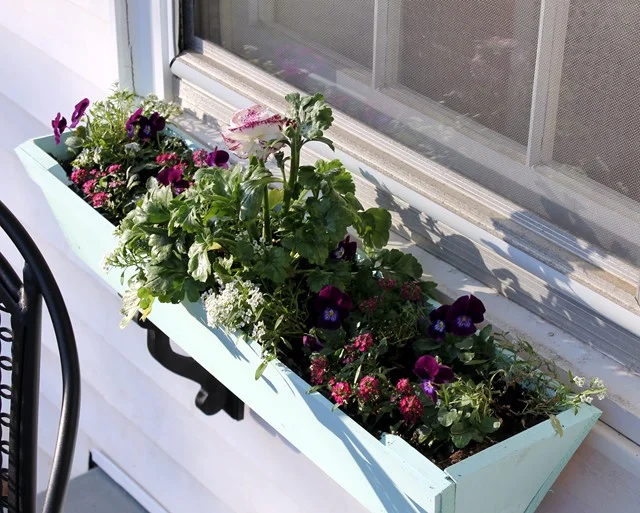
I always wanted a house with window boxes. There is something about them that is just so charming. When we bought our house, I knew a few little window boxes would help bring our little cottage back to life. While shopping around, the pre-made versions were well over $100 which were not in our budget. So we went the DIY route!

EB Loves Old Houses | DIY Window Box

At AC Moore, I found these great 3' wide boxes that were the perfect shape. I can't find them online, but I believe they can still be found in stores in the wood craft section. I think they were around $15 each. I also purchased some basic 1/4" x 1" trim that we cut and nailed onto the top front and box of the window box. I painted the entire box (inside and out) in the same outdoor paint we used on our front door.

EB Loves Old Houses | DIY Window Box

I also wanted to add a little more of a decorative element with the brackets that hold up the boxes. We purchased the same brackets that we used on the patio and spray painted them with Rustoleum Flat Black spray paint. We screwed these into the side of the house and they provided the perfect combination of pretty and practical support for our new little window boxes. I will be honest, I do not have a green thumb, and my pretty flowers died. I ended up replacing them with white faux flowers and those lasted a lot longer. :)

In total, I believe each box cost about $35. Not bad compared to the $100+ options! Plus, I got to paint them in my favorite color. :)